
Dashed Grid
by Jen White
Quickly add trendiness to your next digital project by creating a customizable dashed grid using your favorite font and color.
For this tutorial you will need:
- Photoshop Elements or Adobe Photoshop
Step One: Prepare a New Document
You’ll want to start with a full-sized document so that you can make the grid nice and big. As with any element, it’s okay to make it smaller, but making it bigger will cause pixelation.
- Create a new 12×12 inch document (File > New > Blank File) at 300 ppi with a white background. (PS: Choose File > New.)
- Press the letter D to reset the Color Chips to the default of black over white.
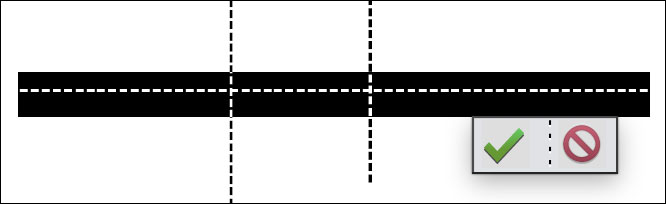
Step Two: Create a Dashed Line
You can create a dashed line many different ways, but the simplest way is to use a dash from a font. You’d be surprised how many different styles of dashes are in your font stash.
- Get the Horizontal Type tool.
- In the Tool Options, open the Font Picker and choose a common font to start with. I’m using Helvetica Regular.
- Set the Size to 40 pt and the Alignment to Center.
- On the document, click in the center to place the cursor.
- Press the dash key until the dashed line nearly reaches the sides of the document. Click the checkmark to commit.
NOTE: You could also call this character a hyphen. The difference between a hyphen and a dash is: a hyphen is not surrounded by spaces, while a dash is.
TIP: Try other looks by using an en-dash or an em-dash. (See below.) Not all fonts will offer these options.


Step Three: Duplicate and Move the Line
- Get the Move tool.
- In the Tool Options, uncheck Auto Select Layer.
- On the document, hold down the Alt key (Mac: Opt key) and click and drag out a duplicate line.

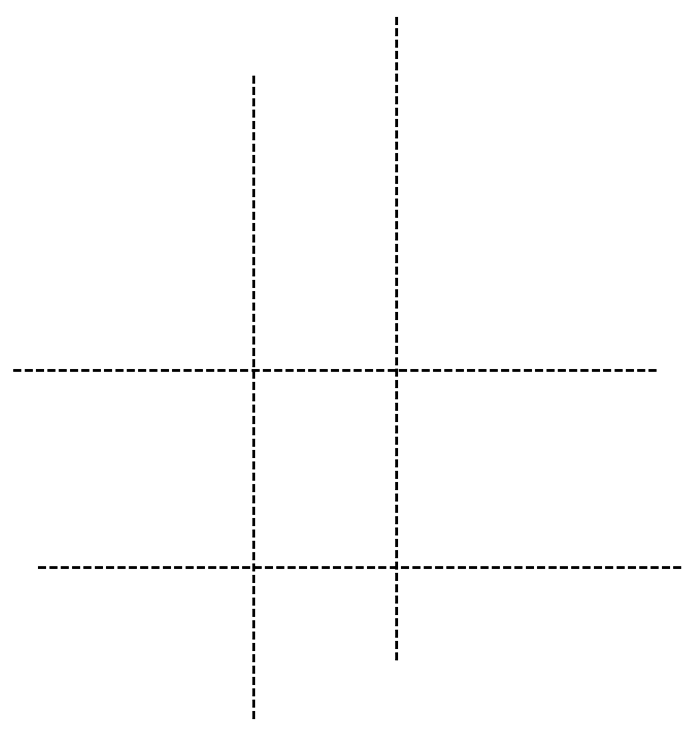
Step Four: Duplicate and Rotate the Lines
-
In the Layers panel, hold down the Shift key and click on the previous line layer. Now both line layers should be active.
-
Press Ctrl J (Mac: Cmd J) to duplicate the line layers.
-
Press Ctrl T (Mac: Cmd T) to get the Transform options.
-
In the Tool Options, set the Angle to 90˚. (PS: Set the Rotate to 90˚.)
-
To reposition the lines, click and drag inside the bounding box.
-
Click the checkmark to commit.

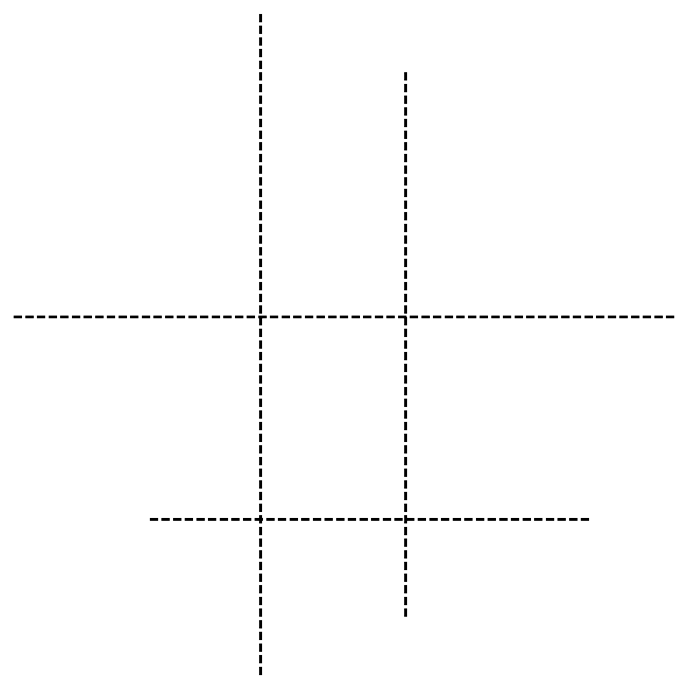
Step Five: Move an Individual Line (Optional)
-
Get the Move tool.
-
In the Layers panel, click on one line layer to activate it all by itself.
-
On the document, click and drag to reposition the active line.
-
Repeat to move other lines.
Step Six: Shorten an Individual Line (Optional)
-
In the Layers panel, double-click on the thumbnail of the line you’d like to shorten. This will highlight/activate all the dashes in the line.
-
Press the Right Arrow key to move the cursor to the end of the line of dashes. This will deactivate all the dashes in the line.
-
Press the Backspace key (Mac: Delete key) until the line is shorter.
-
Click the checkmark to commit.
-
Repeat to shorten other lines.
Step Seven: Change the Appearance of the Grid (Optional)
-
In the Layers panel, click on the top line layer to activate it.
-
Holding down the Shift key, click on the bottom line layer. Now all four line layers should be active.
-
Get the Horizontal Type tool.
-
In the Tool Options, click directly on the name of the font to highlight it.
-
Press the Arrow keys to cycle through the fonts you have available to you. NOTE: Some fonts might require you to lower the Size in order for the grid to fit on the document.
-
Press the Enter key when you find one you like. I’m using Charlemagne Std Regular.

-
In the Tool Options, click on the Color Chip to view color swatches.
-
To choose a custom color, click on the color wheel to open the Color Picker. In the Color Picker, choose a color and then click OK.
-
In the Tool Options, click on the Color Chip to open the Color Picker.
-
In the Color Picker, choose a color and then click OK.

Step Eight: Save the Grid
-
Save the document as a PSD file (File > Save) with a unique name.
-
In the Layers panel, click on the Visibility icon of the Background layer to hide it.
-
Save the document as a PNG file (File > Save) with a unique name.
-
Close the working document without saving.


The fastest way to learn Photoshop Elements or Adobe Photoshop.
Save 15% on QwikLearn Photoshop Elements
Save 15% on QwikLearn Photoshop

_____________________________________________
 Author: Jen White | Contact Us
All comments are moderated.
Please allow time for your comment to appear.
7 Responses
Wanda Bell
Thanks for the pdf of how to do the grid. I will take some of your classes soon. I am retiring in January and will have time I hope to really dig deep into Photoshop elements. Who knows I might even learn photoshop….LOL
Wanda
Jen White
I’m cheering for you, Wanda!
Mary Torres
thanks for the simple explanation on how to create this fantastic effts
Nell Covington
Jen, you are just so creative. Thanks for all the sharing of knowledge and talent you have done over the years.
Jen White
Awe, thanks for your kind words, Nell. 😀
Marie
You and your ideas never cease to amaze me! Thanks Jen
CrimsonCrow
Such a simple addition can make such a cool difference! Thanks. I would never have thought of this.