Pumpkin Palooza
by Syndee Rogers-Nuckles
With Fall comes a chill in the air, leaves and pumpkins everywhere!
My favorite thing about pumpkins (besides their color) is the often overlooked (and some would say bothersome) seeds! I love them roasted as a snack or tossed with a salad. In this tutorial we are going to create a pumpkin using custom shapes. It’s the perfect addition to a fall scrapbook page, greeting card or recipe card.
Step One: Prepare the Workspace
- Create a new 4×4 inch document (File > New > Blank File) at 300ppi with a white background. (Photoshop: Choose File > New.)
- Click on the Foreground Color Clip to open the Color Picker.
- In the dialog box, enter Hex Code #ec8c26 or color of your choosing. Click OK.
Step Two: Create the Pumpkin
- Get the Ellipse tool. It’s nested with the Shape tools.
- Photoshop Elements only: In the Tool Options, click on the Create a New Shape Layer icon. Set the Style to None. Open the Geometry Options and choose Fixed Size. Set the Width to 1.44 inches and the Height 1.713 inches.
- Adobe Photoshop only: In the Tool Options, set the Tool Mode to Shape, the Fill to Solid Color, the Stroke to None, the Path Operations to New Layer. Set the Path Options to Fixed Size, the Width to 1.44 inches, and the Height 1.713 inches.
- On the document, click and drag to place the shape in the position shown below.

- In the Tool Options, click Simplify. (Photoshop: In the Menu Bar, choose Layer > Raterize > Shape.)
- Press Ctrl J (Mac: Cmd J) to duplicate the layer.
- Get the Move tool.
- On the document, while holding down the Shift key, click and drag the duplicate shape into position to the right of the first shape as shown below.

- Click on the Foreground Color Clip to open the Color Picker.
- In the dialing box, enter Hex Code #faa244 or color of your choosing. Click OK.
- Get the Ellipse tool.
- Photoshop Elements only: In the Tool Options, open the Geometry Options and choose Fixed Size. Set the Width to 1.197 inches and the Height 1.76 inches.
- Adobe Photoshop only: In the Tool Options, open the Path Options and choose Fixed Size. Set the Width to 1.197 inches and the Height 1.76 inches.
- On the document, click and drag to create a shape on top of the first two as shown below.
- In the Tool Options, click Simplify. (Photoshop: In the Menu Bar, choose Layer > Rasterize > Shape.)
- To reposition the new shape, get the Move tool and use the Arrow keys.

Step Three: Create a Stem and Leaves
- Click on the Foreground Color Clip to open the Color Picker.
- In the dialing box, enter Hex Code #5e3f1f or color of your choosing. Click OK.
- Get the Custom Shape tool.
- Photoshop Elements only: In the Tool Options, click on the Create a New Shape Layer icon. Set the Style to None. Open the Custom Shape Picker and choose the Hedera 2 shape. If you don’t see the Hedera 2 shape, open the Custom Shapes menu and choose Ornaments. Open the Geometry Options and choose Fixed Size, set the Width to 2.607 inches, and the Height 2.11 inches.
- Adobe Photoshop only: In the Tool Options, set the Tool Mode to Shape, the Fill to Solid Color, the Stroke to None, and the Path Operations to New Layer. Open the Path Options and choose Fixed Size. Set the Width to 2.607 inches, and the Height 2.11 inches. Open the Custom Shape Picker. Choose the Legacy Shapes and More > All Legacy Default Shapes > Ornaments > Hedera 2. To see the names of the shapes, click on the flyout menu and choose Large List.
NOTE: If you don’t see the Legacy Shapes and More folder, open the Shapes panel (Window > Shapes), then open the flyout menu and choose Legacy Shapes and More.
- On the document, click and drag to create the shape in the position shown below.

- Press Ctrl T (Mac: Cmd T) to get the Transform Options.
- In the Tool Options, click on the Rotate icon, and set the Angle to 65 degrees.
- Click the checkmark to commit.

- Press Ctrl J (Mac: Cmd J) to duplicate the layer.
- In the Layers panel, double click on the thumbnail of the duplicate shape layer to open up the Color Picker.
- In the dialog box, enter Hex Code #768d46 or color of your choosing. Click OK.
- In the Tool Options, click Simplify. (Photoshop: In the Menu Bar, choose Layer > Rasterize > Shape.)

- In the Layers panel, click on the brown stem layer to activate it.
- In the Tool Options, click Simplify. (Photoshop: In the Menu Bar, choose Layer > Rasterize > Shape.)
- In the Layers panel, drag the brown stem shape down below the pumpkin layers.
- Click on the green stem layer to activate it.
- Get the Lasso tool.
- In the Tool Options, click on the New Selection icon and set Feather to 0.
- On the document, click and draw around the shape, leaving only the leaf area unselected. See below.

- Press the Backspace key (Mac: Delete key) to delete the selected pixels.
- In the Menu Bar, choose Select > Deselect.

- Press Ctrl J (Mac: Cmd J) to duplicate the leaf layer.
- Press Ctrl T (Mac: Cmd T) to get the Transform Options.
- In the Tool Options, click on the Rotate icon and set the Angle to 180 degrees.
- On the document, click and drag inside the bounding box to move the duplicate leaf into position as shown below.
- Click the checkmark to commit.

Step Four: Add an Inner Glow
- In the Layers panel, click on the center pumpkin shape to activate it.
- In the Menu Bar, choose Layer > Layer Style > Style Settings. (Photoshop: Choose Layer > Layer Style > Inner Glow.)
- Photoshop Elements: In the dialog box, click on Glow to to twirl it open. Choose Inner. Set the Size to 65 px. Click on the Color Chip and enter Hex #723f08. Click OK. Set the Opacity to 72%. Click OK.
- Adobe Photoshop only: Choose Inner. Set the Size to 65 px. Set the Blend Mode to Screen, the Opacity to 72%, and the Noise to 0. Set the Elements Technique to Softer, the Source to Edge, the Choke to 0, and Size to 65px. Set the Quality Range to 50% and Jitter to 0%. Click on the Color Chip and enter Hex #723f08. Click OK. Click OK to close the dialog box.

Step Five: Move the Pumpkin onto a Scrapbook Page
- Save the document (File > Save As) as a layered PSD file.
- Open a layered scrapbook page (File > Open) on which you would like to use the pumpkin.
- In the Layers panel, click on the top layer to activate it.
- Activate the pumpkin document.
- In the Layers panel, click on the bottom pumpkin layer (not the Background layer) to activate it. Then holding down the Shift key, click on the top pumpkin (leaf) layer. All pumpkin layers should now be active.
- On the document, click on the pumpkin and drag it onto the scrapbook page.
You can use the Pumpkin as is or to add more visual interest clip papers and add drop shadows to the layers as shown in the sample below. Think of all the possibilities!
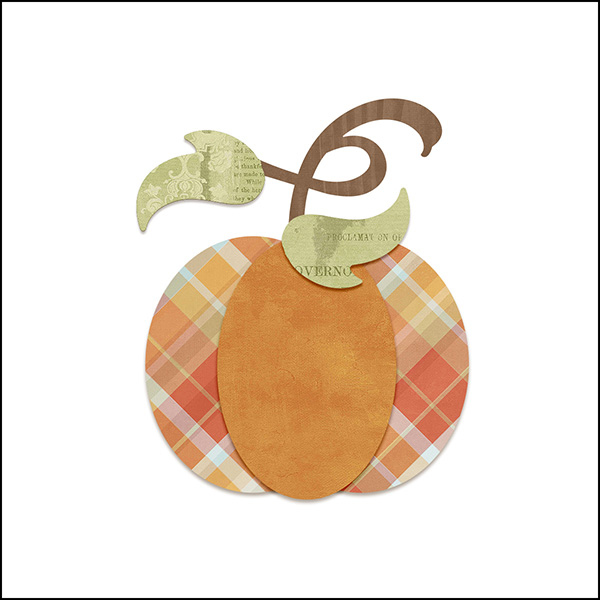
Here’s my finished layout after I’ve added my pumpkin!

Credits:
Page & Photo: Syndee Rogers-Nuckles, Jenko Ataman
Kit: Eggs in my Bonnet by Amber Shaw, Sweetie Pie by Brandy Murry
Fonts: Brock Script, Century Gothic
Software: Photoshop Elements 14, Adobe Photoshop CC 2014
_____________________________________________
 Author: Syndee Rogers-Nuckles | Contact Us
All comments are moderated.
Please allow time for your comment to appear.
7 Responses
Tawnya
Thank you for this cute tutorial!
Shawn
I’m not sure why I can’t create the pumpkin in CCPS2020. I create the 4×4 new document. I follow all of the instructions but when I try to actually create the ellipse layer nothing is there. The first time I tried I was able to get the first ellipse layer, rasterize it and then copy it. When I tried the third layer I did the exact same thing with the different fixed size, I tried to draw the shape and nothing comes up. I closed the file, restarted Photoshop and still nothing. I’m sure there is some tool or setting that I’m missing but I’ve followed the directions to the letter and still having problems.
Syndee Rogers
Hello Shawn!
It sounds like you might have ‘Path’ selected in the Options Bar instead of ‘Shape’. It needs to be ‘Shape’ otherwise it looks like nothing is there because it’s a path.
Rhonda J
Thank you for the tutorial. It helped me see how putting shapes together to make a whole graphic.
Syndee Rogers-Nuckles
That’s why I LOVE shapes, they are so versatile!
Shirl
That’s a cutie pie for sure. Thank you for another fantastic tutorial. This is so welcome during this grand season of thankfulness and giving. Hugs. 🙂
Syndee Rogers-Nuckles
So glad you like it!