
An Eye for Contrast
by Jen White
I love my Fiona Jeanne.
I love the way she fusses with her curly blonde hair. I love the big smile she gets when she runs to give me a hug. I love the hilarious things she says.
But most of all, I love the big round eyes she flashes at me when she gets excited about something I’ve said or done.
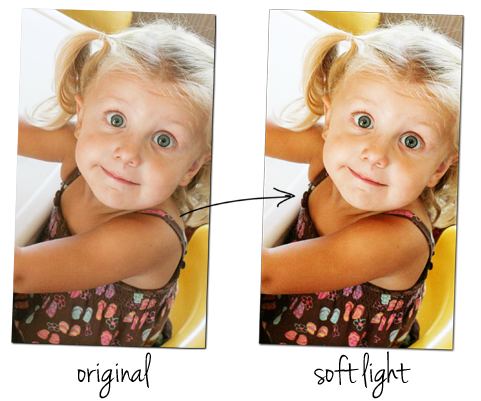
In this tutorial I’ll show you one quick and easy way to add stunning contrast to the eyes of your subject without altering the rest of the photo.
Step One: Open a Photo
- Open a photo (File > Open).
- In the Menu Bar, choose File > Duplicate and click OK. (Photoshop: Choose Image > Duplicate.)
- Close the original photo (File > Close).
Step Two: Create a Soft Light Layer
- Press Ctrl J (Mac: Cmd J) to duplicate the photo layer.
- In the Layers panel, change the Blend Mode of the new layer to Soft Light.
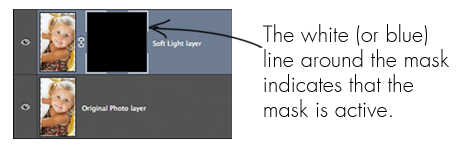
Step Three: Add a Black Layer Mask
- In the Layers panel, click on the Add Layer Mask icon.
- Press the letter X to reset the Color Chips to the default of black and white.
- In the Layers panel, click on the white layer mask to make sure it’s still active.
- Press Alt Backspace (Mac: Opt Delete) to fill the layer mask with black. This will completely hide the Soft Light layer.
Step Four: Reveal the Eyes
- Get the Brush tool.
- In the Tool Options, set the Mode to Normal and the Opacity to 100%. (Photoshop: Also set the Flow to 100%.) Open the Brush Preset Picker and choose a Soft Round brush. If you don’t see a Soft Round brush, open the drop-down menu and choose Default Brushes. (Photoshop: Open the fly-out menu, choose Reset Brushes, and click OK.)
- Press the letter X to make the Foreground Color Chip white.
- In the Layers panel, click on the black layer mask to make sure it’s still active.
- On the photo, click on the irises of the eyes to reveal them. To change the size of the brush, press the right and left Bracket keys.

Here is my completed scrapbook page using this tip. I’d love to see your before and after photos in the Digi Scrap Tutorial Gallery.

Credits:
Page & Photo: Perfect Me by Jen White
Tutorial: An Eye for Contrast by Jen White
Kit: Perfect Harmony by Digilicious Designs
Software: Photoshop Elements 13, Adobe Photoshop CC
Originally published in 2012.

If you liked this tutorial, you might also like:
![]()

Use Photoshop (and Photoshop Elements) Actions to streamline your photo editing process and get a better end result. This class includes 36 photo editing actions and two BONUS classes on incorporating the Amazing Camera Raw into your editing workflow and on Editing Without Actions, for those times when you can’t use an action.
Learn more about Actions: Fix Photos FAST! class.
![]()

Download 100+ must-have Photo Enhancing Actions for your Toolkit. Your photos can look great in seconds! PLUS—you can add artistic effects, such as enhanced color, vintage, fun and funky, and more!
This class also provides video training with inspirational before and after examples, ideas for using the actions, plus bonus training on how to organize actions.
Learn more about Actions: Enhance Photos FAST! class.
![]()
Whether you’re just getting started in digital scrapbooking or are self taught and want to fill in the gaps in your education, the Learn Digital Scrapbooking Class will help you get up to speedFAST and become the confident, competent digital scrapbooker you deserve to be.
This self-paced class will take you where you want to go and is available for Photoshop Elements 11 to 13, Photoshop Elements 6 to 10, and Photoshop CS4 through Creative Cloud.
Learn more about the Learn Digital Scrapbooking class!
![]() _____________________________________________
_____________________________________________
 Author: Jen White | jen@digitalscrapper.com
All comments are moderated.
Please allow time for your comment to appear.
One Response
Terri
Your photo is so cute. Thanks for sharing your expertise. The finished page is beautiful.