Text Out of the Box
by Nannette Dalton
Words are important. We use words to communicate with our friends and family; we use words to conduct business. Words are a huge part of every aspect of our lives. It’s hard to imagine a world without words.
Words are also important on our scrapbook pages. They help us tell the story; they record important dates and events; they let us share our thoughts and emotions. Sometimes we need a little more than that square shaped text box to express the important words we are trying to share.
Today we are going to take that text right out of the box and put it into a custom shape that you can use to fill a journaling spot or as its own element on a page.
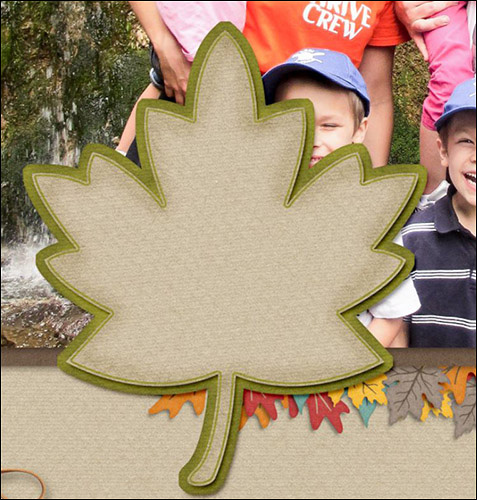
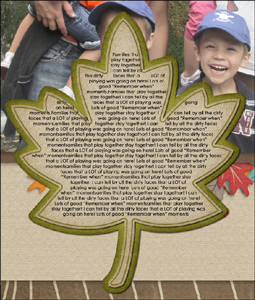
In the October 2014 Tidbit, I taught you how to make this leaf journaling mat. Today I will show you how to journal inside the leaf shape.
Step One: Open a Scrapbook Page
- Open the layered scrapbook page (File > Open) with which you would like to work.
- In the Layers panel, activate the top layer.
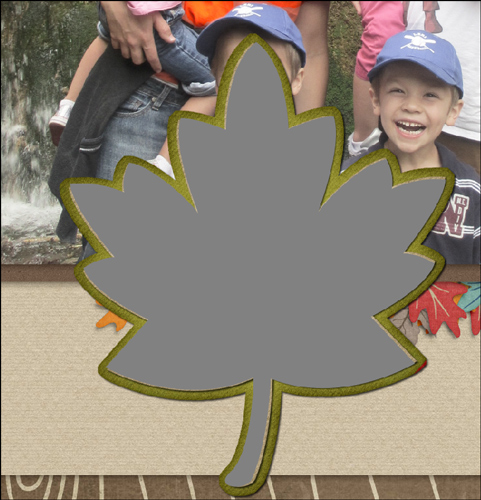
Step Two: Create a Leaf Shape
- Get the Custom Shape tool.
- In the Tool Options, set the Style to None and click on the Create New Shape Layer icon. (Photoshop: Set the Tool Mode to Shape and the Path Operations to New Layer.) Set the Color to 50% Gray. Open the Geometry Options and choose Unconstrained. Open the Custom Shape Picker and choose Leaf 5. If you do not see the Leaf 5 shape, open the fly-out menu and choose Large List. Open the drop-down menu and choose All Elements Shapes. (Photoshop: Open the fly-out menu, choose All, and click OK.)
- On the scrapbook page, while holding down the Shift key, click and drag to create a proportional leaf shape.
Note: This will work with all shapes. I am using the Leaf 5 shape if you want to follow along. I made my shape the same size as my original leaf mat.
Step Three: Add Some Journaling
- Press the letter D to reset the Color Chips to the default of black and white.
- Get the Horizontal Type tool.
- In the Tool Options, choose a Font and set the Size as desired. I am using Century Gothic Regular at 14 pt. Set the Leading to Auto. Click on the Center Text icon (PSE 10: Also set the Style to None.)
- On the scrapbook page, hover your mouse over the leaf shape. A dotted circle will appear around the Type icon. Click anywhere inside the leaf shape and begin typing. Click the checkmark to commit the type.
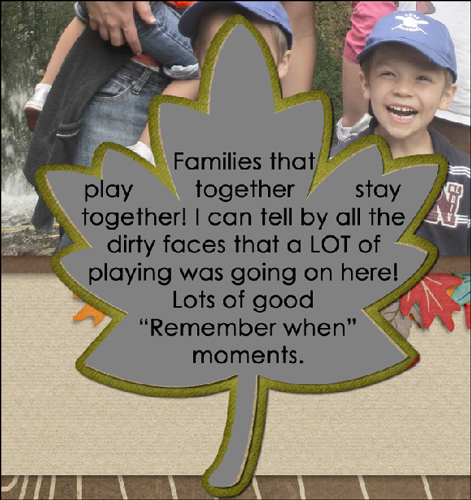
- Press Ctrl T (Mac: Cmd T) to get the Transform options.
- On the scrapbook page, while holding down the Alt key (Mac: Opt key), click on a corner handle of the Bounding Box and drag inward to bring the text away from the edge of the leaf shape. (Photoshop: Hold down Shift Alt (Mac: Shift Opt) while dragging.) Click on the checkmark to commit the transformation.
- In the Layers panel, click on the leaf shape layer and drag it to the Trash icon.
My journaling stays within the bounds of the leaf. If I were to journal a little more and change my font to a smaller size, it would take on more of the leaf shape.
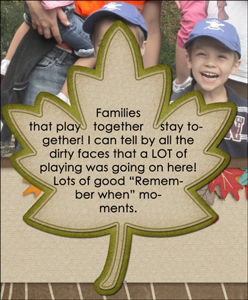
Here is a little extra tip: Sometimes the journaling looks better with fully justified text. Here are the instructions to do that.
Step Four: Fully Justify the Text (Optional)
- In the Layers panel, double click on the thumbnail of the Type layer to highlight the text.
- Press Ctrl Shift J (Mac: Cmd Shift J) to justify the type within the shape.
- Click on the checkmark to commit the change.
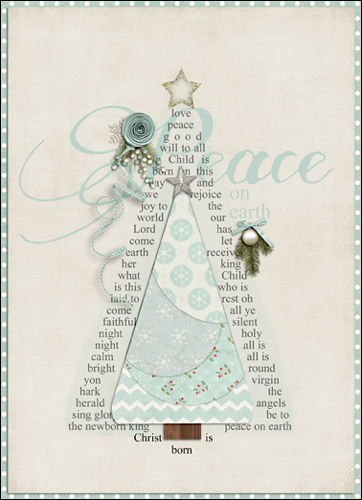
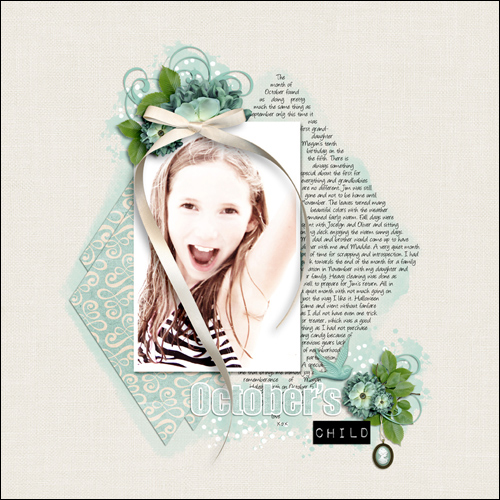
Here are some great examples from Creative Team member Kathy. She has filled a shape with journaling then used that as an element on her page.
Kathy’s pages are linked for credits.
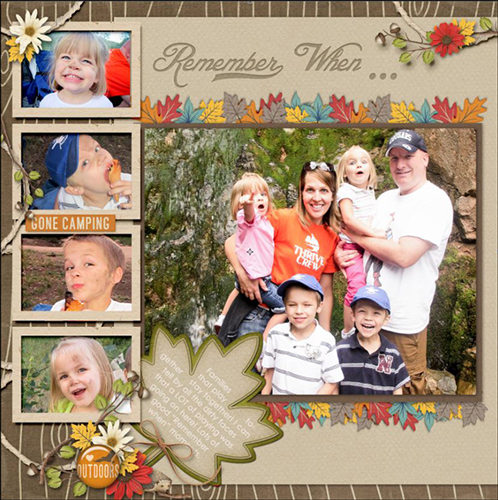
Here is my finished layout using “text out of the box.” I’m excited to see how you might use this technique in your scrapbooking. Post your layouts in the Digi Scrap Tutorial Gallery so we all can see.
Credits:
Digi Scrap Tutorial: Text Out of the Box by Nannette Dalton
Scrapbook Page: Remember When by Nannette Dalton
Photos by Misty Marsh
Software: Photoshop Elements 12, Adobe Photoshop CC 2014
Custom Shape Journal Mats Tidbit by Nannette Dalton
Kit: Nature’s Playground by Kim Broedelet
Fonts: Blessed Day, Century Gothic

_____________________________________________
 Author: Nannette Dalton | nann@digitalscrapper.com
All comments are moderated.
Please allow time for your comment to appear.
20 Responses
Jenifer
Nann, this is just awesome – can’t wait to try it!! 🙂
Jeffri
Thank you very much for the wonderful tutorial! I also very much appreciate the easy-to-save PDF file of the tutorial! Thank you for sharing your experience and ideas with us!!!
Lidia
What a cool technique, Nann! I need to try this one myself! I always love your tutorials and use it on some of my layouts! 🙂
Nann Dalton
Thanks so much Lidia.I would love to see how you use this on one of your beautiful layouts.
Shirl
I knew there had to be a better way to do this in PSE. (I won’t mention what I used to cheat.) Along comes Digiralscrapper to the rescue through our Queen tutorial/design expert, none other than, Tah-Dah, drum roll please, Ms. Annette Dalton. Love that you continued from your previous shape tutorial with Part 2. What can I say except, You Are The Most!! 🙂
Nann Dalton
What?? A drum roll… you make me blush. Thanks Shirl, a girl can always count on you for a kind word!
Sally Stewart
Your willingness to share your techniques is not only inspiring but generates such good feelings toward you and others!
I thank you from my heart.
Nann Dalton
Wow, thank you Sally. Your kind words have generated good feelings here too!
Doris
Neat! Great idea.
Nann Dalton
Thanks!
Sue
I LOVE seeing text in shapes, but can never seem to remember how to do it. Thanks, this is very helpful.
Nann Dalton
Yea, I like to be helpful!
Barb
I totally love this! and can’t wait to use this technique!
Nann Dalton
Ah Barb, Thank you.
Terri
Thanks so much for the tutorial. I am forever trying to solve my text box shapes adding spaces here and there to make it work. Your way is so much easier and looks better too. This is great!!
Nann Dalton
Oh yes, I have been there too. I am so glad you find this useful.
Annette
Can’t wait to try this great idea
Nann Dalton
Annette you’re a sweetheart.
Janet West
Thank you for sharing this great idea.
Nann Dalton
You’re welcome Janet