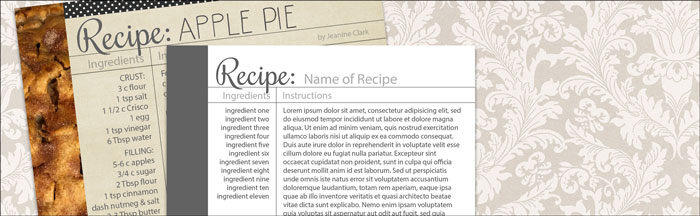
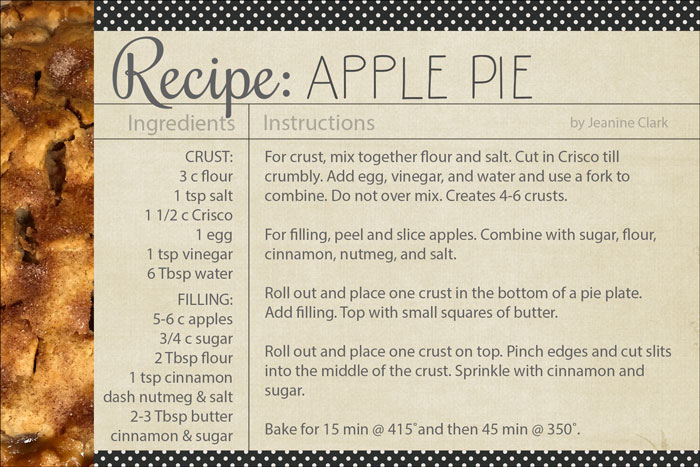
Recipe Card Template
by Jen White
Make your favorite recipes sharable and pretty with our recipe card template.
For this tutorial you’ll need:
- Photoshop Elements or Adobe Photoshop
- Recipe Card Template (Download Here)
Watch Recipe Card Template the Video
Step One: Download and Open the Template
- Download the recipe card template (above) and unzip the file.
- Open the recipecard1-DigitalScrapper.psd file (File > Open).
- In the Menu Bar, choose File > Duplicate and click OK. (PS: Choose Image > Duplicate.)
- Close original recipe card document.

Step Two: Clip a Photo to the Photo Mask
-
In the Layers panel, click on the photo clipping mask layer to activate it.
-
Open a photo (File > Open) of your recipe.
-
ALT 1: Find a good quality photo online that well represents your recipe.
-
ALT 2: Use a paper instead of a photo.
-
-
Get the Move tool.
-
Holding down the Shift key, click and drag the photo onto the recipe document.
-
In the Menu Bar, choose Layer > Create Clipping Mask.
-
Press Ctrl T (Mac: Cmd T) to get the Transform options. If you cannot see the bounding box, press Ctrl 0 (Mac: Cmd 0).
-
To resize the photo, click and drag on the corner handles of the bounding box.
-
To rotate the photo, hover your cursor over a corner handle of the bounding box until you see a double-headed arrow, then click and drag to rotate.
-
To reposition the photo, click and drag inside the bounding box.
NOTE: Make sure the boundaries of the photo extend past the boundaries of the photo mask.
-
Click the checkmark to commit the change.
-
In the Layers panel, click on the Background layer to activate it.
-
Press Ctrl 0 (Mac: Cmd 0).
Step Three: Replace the Text
-
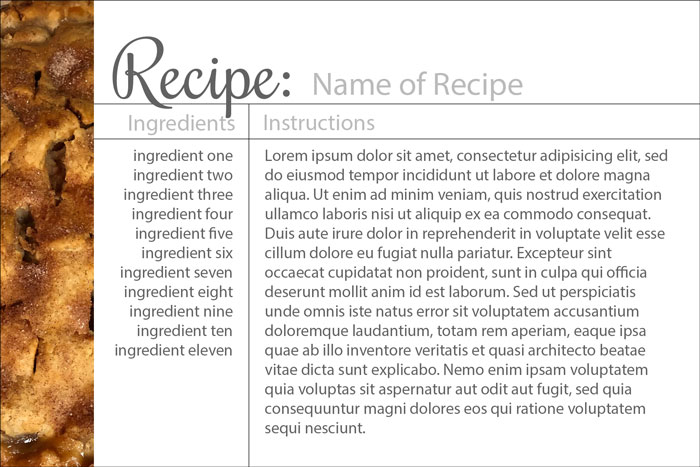
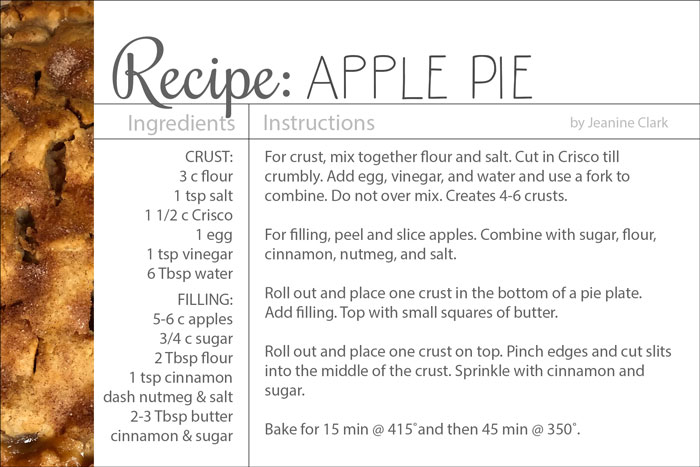
In the Layers panel, double click on the thumbnail of the NAME OF RECIPE layer to highlight the text of that layer.
-
Type in the name of your recipe and click the checkmark to commit.
-
Get the Horizontal Type tool.
-
In the Tool Options, open the Font Picker and choose a font. I’m using Oh Wonder Sans. Adjust the Size of the font to fit the template.
-
In the Layers panel, raise the Opacity to 100% if desired.
-
In the Layers panel, double click on the thumbnail of the INGREDIENT ONE… layer to highlight the text of that layer.
-
Type in the ingredients for your recipe and click the checkmark to commit.
-
In the Layers panel, double click on the thumbnail of the LORUM IPSUM… layer to highlight the text of that layer.
-
Type in the instructions for your recipe and click the checkmark to commit.
Step Four: Add a Plain Background (optional)
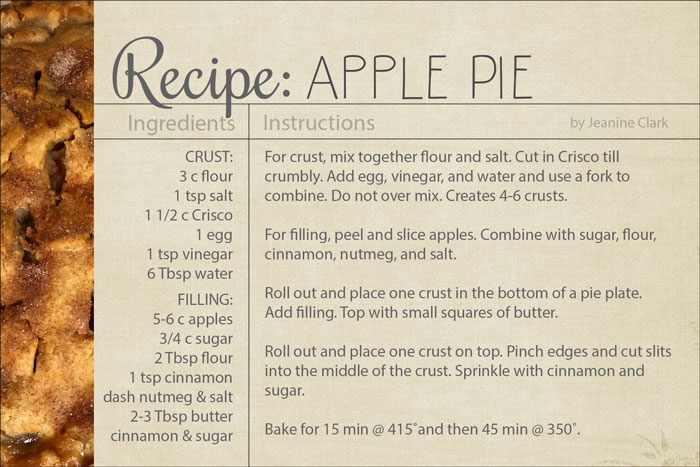
-
In the Layers panel, click on the Background layer to activate it.
-
Open a plain paper (File > Open) that coordinates with your photo.
-
Get the Move tool.
-
Holding down the Shift key, click and drag the paper onto the recipe document. If necessary, in the Layers panel click and drag the paper layer directly above the Background layer.
-
Press Ctrl T (Mac: Cmd T) to get the Transform options.
-
In the Tool Options, click and drag to the right or left on the Height or Width icon to resize the background paper as desired.
NOTE: Make sure the boundaries of the paper extend past the boundaries of the document.
-
Click the checkmark to commit the change.
Step Five: Add Additional Papers (optional)
-
In the Layers panel, click on the RECIPE: layer to activate it.
-
Open a patterned paper (File > Open) that coordinates with your photo and background.
-
Get the Move tool.
-
Click and drag the paper onto the recipe document. If necessary, in the Layers panel click and drag the paper layer directly below the RECIPE: layer.
-
Press Ctrl T (Mac: Cmd T) to get the Transform options.
-
In the Tool Options, click and drag to the right or left on the Height or Width icon to resize the background paper slightly smaller than the width of the recipe card.
-
Click the checkmark to commit.
-
Get the Move tool.
-
In the Tool Options, uncheck Auto-Select.
-
On the document, click and drag the paper to bottom of the document so that it fills in the gap between the recipe and the bottom edge of the document.
-
Press Ctrl J (Mac: Cmd J) to duplicate the paper.
-
On the document, hold down the Shift key and click and drag the duplicate paper to the top of the document so that only a small portion appears.
-
To fine tune the placement, use your keyboard Arrow keys.
Step Six: Save and Close
- Double check your spelling and details.
-
Save the document (File > Save As) as a high quality JPG file.
-
Close the working document without saving.
Saving & Sharing Options:
-
Use the JPG recipe for printing and sharing.
-
Print the recipe on 4×6 photo paper.
-
Collect your recipes in a recipe box or a notebook with 4×6 photo sleeves.
-
Share the JPG recipe via email or social media.
-
Use the JPG recipe on a scrapbook page.

Note: The above download link includes the manual and video for working with the recipe card template.
_____________________________________________
![]() Author: Jen White | Contact Us
Author: Jen White | Contact Us
All comments are moderated.
Please allow time for your comment to appear.
17 Responses
Jan Holdridge
Thank you. I’ll be using this on my blog.
Shirl/Grambie
Thanks Jen for another one of your wonderful tutorial and so cute finish product. As usual, I am late but the hands are not cooperating. I am still struggling, but thankful for my blessings. Loving holiday to you and yours. 🙂
Marianne
Thank you so much once again. Wonderful tutorial and so much fun.
Cheryl M
Thanks so much Jen for the recipe template! Can’t wait to put it to use!
Maggie
This is so fun. I’ve already decided to get going with using this to print all my mom’s recipes and have asked one of my sisters for any recipes and pictures she has. Thanks for the inspiration Jen
Barbara
Thanks so much for all the fun and sharing Jen.
Nannette Dalton
How fun Jen! You are brilliant!
Sharon
Is anyone else having problems downloading the video/PDF for this? I am able to download just the template, but my browser keeps saying it is waiting for digitalscrapper.com. I even tried a different browser thinking that might help, but it makes no difference. I am able to download the pdf from the Facebook site, but that is not the step-by-step directions. I would appreciate any suggestions because I really like this project.
Jen White
Hi Sharon. I’ll try and help. Try Right-clicking (Mac: Ctrl-clicking) on the download image and choose Open in New Tab (or something similar). Sometimes that works. If that doesn’t help, contact me via email and I’ll help you get it sorted out.
dondi
Thank you so much for sharing.
What happens when your recipe text or ingredients are longer that the spaces provided in the template?
Is there a way to create a backside of the recipe card?
Jen White
Great question, Dondi.
For printing, you could also decorate the backside and print on double sided photo paper or card stock.
For online sharing, you’d have to post two images, a front and a back.
But, you also try:
— make the type smaller
— try different fonts that take up less space
— adjust the tracking and/or leading of the type
— abbreviate some words
Suzanne Gmirek
Thanks much! Both the card and the recipe look wonderful. Can’t wait to try.
Diane McCurdy
Thank You! Would you please share you cit-out cookie recipe with us also?
Jen White
Hi Diane. You will find the cut out cookie recipe in the Make & Take Album on Facebook. You’ll find the link at the bottom of this post. 😄
Carla
What a great idea!!! Thank you for the template!
Joyce B
Wonderful! Thank you, Jen!
Joyce K
This is awesome! Thank you!!!