
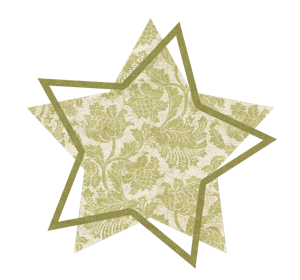
Offset Outlining
Add instant whimsy to a shape with a simple offset stroke outline.
Step One: Create a Workspace
- Create a new 12×12 inch document (File > New > Blank File) at 300 ppi with a white background. (PS: Choose File > New.)
- Press the letter D set the Color Chips to the default of black over white.
Step Two: Add a Shape
- Get the Custom Shape tool.
Photoshop Elements Only:
- In the Tool Options, open the Custom Shape Picker and choose the 5 Point Star. Set the Style to None and the Geometry Options to Unconstrained. Click on the Create New Shape Layer icon. If you do not see the 5 Point Star, open the Custom Shape Picker, then open the drop down menu and choose All Elements Shapes.
Adobe Photoshop Only:
- In the Tool Options, set the Tool Mode to Shape, the Stroke to None, and the Path Operations to New Layer. Open the Settings and choose Unconstrained. Open the Shape Picker and choose 5 Point Star.
- If you do not see the 5 Point Star, open the Custom Shape Picker, then open the drop down menu and choose All. Click OK to confirm the change.
- On the document, hold down the Shift key and click and drag out the shape.

Step Three: Add a Stroke Outline
- In the Layers panel, hold down the Ctrl key (Mac: Cmd key) and click on the thumbnail of the shape layer to get a selection outline.
- Press Shift Ctrl N (Mac: Shift Cmd N) to get a New Layer dialog box.
- In the dialog box, name the layer STROKE and click OK.
- In the Menu Bar, choose Edit > Stroke (Outline) Selection. (PS: Choose Edit > Stroke.)
- In the dialog box, set the Width to 20 and the Location to Inside. Click on the Color Chip. In the Color Picker, choose a medium shade of gray and click OK. Click OK again to commit the Stroke settings.
- Press Ctrl D (Mac: Cmd D) to deselect.

Step Four: Offset the Stroke Outline
- Press Ctrl T (Mac: Cmd T) to get the Transform options.
- On the document, hover your cursor near a corner handle of the bounding box and click and drag in a clockwise direction.
- Optional) To reposition the stroke outline, click and drag inside the bounding box.
- Click the checkmark to commit.

Options for Getting Creative
- Recolor the shape and stroke.
- Use the shape and stroke as clipping masks.
- Find unusual things to try technique with, like:
- a letter or number from the Type tool
- a stamp from the Brush tool
- an element from your stash


Credits
Kit: Rosehill Cottage by Cindy Rohrbough
Font: Arial Black
CAUTION: Drop Shadow Rule
The star and stroke used for this tutorial are both 2D object. Neither have drop shadows. But if you add a drop shadow to the star, you will also need to add a drop shadow to the stroke.

NOTE: This is an Encore Tutorial. This tutorial was published in its original form by Sara Horton on July 6, 2009. It has been reformatted and upgraded to reflect current software versions.
_____________________________________________
 Author: Jen White | Contact Us
All comments are moderated.
Please allow time for your comment to appear.
One Response
Nish
Thanx a lot for this tutorial… This technique is neat! Useful for beginner learners like me to add a subtle yet artistic effect to embellishments and elements.