Wood Veneer Accents
by Lidia Sari
Remember when wood veneer was all the rage? From car manufacturing to interior design, people put wood veneer wall to wall! I still remember they even had wood veneer telephones, toilet seats, and counter tops. It seemed like everything could be made to look like wood. Well you know what? It’s back!!! Of course I do not see it as much as before, but wood veneer has made a comeback in scrapbooking.
I am using a hexagon frame shape for this tutorial, but feel free to use any shapes you want to work with. Let’s get started!
Step One: Prepare the Workspace
- Create a new 2.5 x 2.5 inch document (File > New > Blank File) at 300 ppi with a white background. (Photoshop: Choose File > New.)
- Press the letter D to reset the Color Chips to the default of black and white.
Step Two: Create a Shape
- Get the Custom Shape tool.
- In the Tool Options, set the Style to None and the Geometry Options to Unconstrained. Click on the Create New Shape Layer icon. (Photoshop: Set the Tool Mode to Shape and the Path Operation to New Layer.) Open the Custom Shape Picker and choose the Hexagon Frame shape. If you don’t see the Hexagon Frame shape, open the drop-down menu and choose All Elements Shapes. (Photoshop: Open the fly-out menu, choose Reset Shapes, and click OK.)
- On the document, while holding down the Shift key, click and drag to create a hexagon frame shape that fills most of the document. Press and hold the Space bar to reposition the shape while dragging.
- In the Tool Options, click Simplify. (Photoshop: In the Menu Bar, choose Layer > Rasterize > Shape.)
- In the Layers panel, double click directly on the name of the shape layer and name it Hexagon Frame.

Step Three: Add a Wooden Pattern Paper
- Open a wood patterned paper of your choice (File > Open). If you do not have a wood patterned paper, click HERE to download the one I’m using.
- Get the Move tool.
- On the document, click on the paper and drag it onto the hexagon frame document.
- Press Ctrl T (Mac: Cmd T) to get the Transform options.
- If you can not see the Bounding Box, press Ctrl 0 (Mac: Cmd 0).
- On the document, click on a corner handle of the Bounding Box and drag inward to resize the paper, making it slightly larger than the hexagon frame. (Photoshop: Press and hold the Shift key while dragging to maintain proportions.) Double click inside the Bounding Box to commit the transformation.
- In the Menu Bar, choose Layer > Create Clipping Mask.
- In the Layers panel, activate the hexagon frame shape layer.
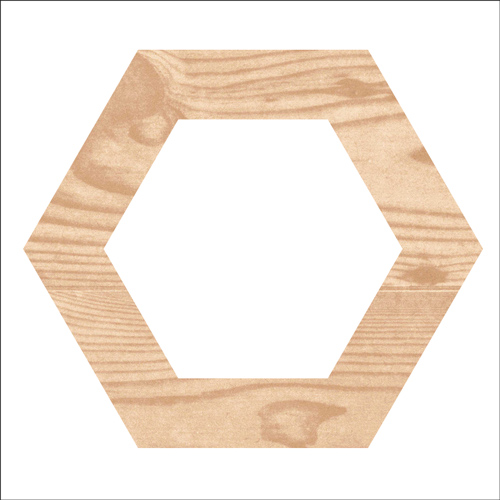
Step Four: Add a Style
- Click HERE to download the Wood Veneer Style.
- Install the layer style. You can find instructions for how to install the style for your version of Photoshop or Photoshop Elements HERE.
Elements Only:
- In the Effects panel (Window > Effects), click on Styles.
- Double click on the DS-Wood-Veneer-Style icon to apply the style to the hexagon frame.
Photoshop Only:
- In the Menu Bar, choose Window > Styles to open the Styles panel.
- In the Styles panel, click on DS-Wood-Veneer-Style to apply the style to the hexagon frame.
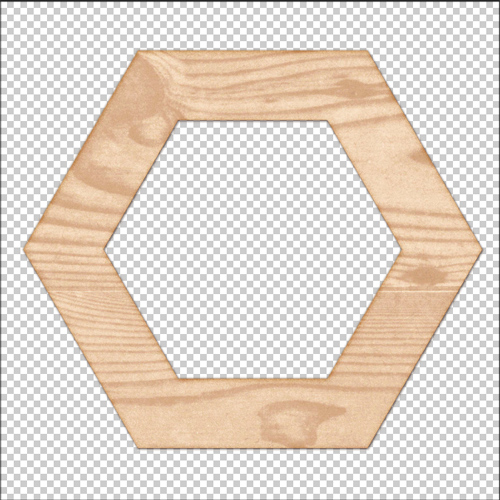
- In the Layers panel, click on the Background layer and drag it to the Trash icon.
- In the Menu Bar, choose Layer > Merge Layers
- Save the element (File > Save As) as a PNG file.
Step Five: Use The Wood Veneer Elements
- Open the layered scrapbook page on which you would like to use the wood veneer element.
- Activate the wood veneer element document.
- Get the Move tool.
- On the document, click on the element and drag it onto the scrapbook page.
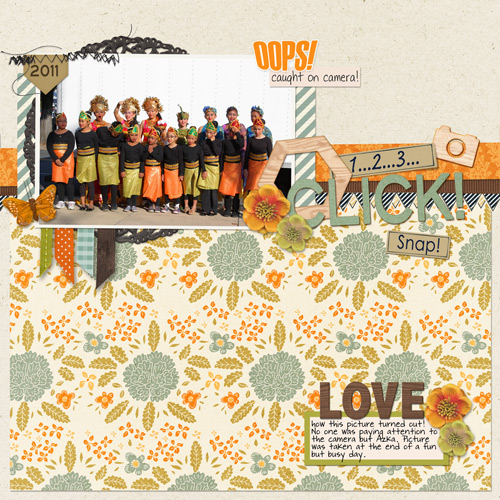
Here’s my finished layout using the wood veneer element I made. Don’t be afraid to use a different paper to get a totally different look on the element. For the “love” word art, I duplicated the element twice. I also added drop shadows to all the wood veneer elements that I made. For me wood veneer is just the right embellishment to use here to avoid adding chaos to an already busy layout.
Credits:
Digi Scrap Tutorial: Wood Veneer Accents by Lidia Sari
Software: Photoshop Elements 12 and Photoshop CC 2014
Scrapbook Page: 1…2…3… Click! by Lidia Sari
Controlling Color Chaos Tutorial by Jen White
Papers and Elements: Christmas Wishes by Kristin Cronin-Barrow, Big Ideas by One Little Bird, Per Diem by One Little Bird, Spirit of Christmas by Laurie Ann, Autumn Days by Kristin Cronin-Barrow
Fonts: Journaler’s Toolbox by Darcy Baldwin

_____________________________________________
 Author: Lidia Sari | lidia@digitalscrapper.com
All comments are moderated.
Please allow time for your comment to appear.
6 Responses
Donna
Great tutorial Lidia! Thanks for sharing this.
Lidia Sari
Thank you all so much for the lovely comments. It is my pleasure to be able to share it with you! 😀
Jen White
Absolutely LOVE this tutorial, Lidia!
Jeffri Moore
Thank you very much for sharing a very cool tutorial! And for sharing the Style and instructions as well. The PDF file is very much appreciated!!!
Nannette
This is so fun Lidia. I can see all kinds of ways to use it.
Sharon
Awesome tutorial, Lidia!