Quick and Easy Traveling Type
by Jen White
Train your type to travel sensibly over the shadowed terrain of 3D objects with quick and easy Layers panel magic.
The Problem with Traveling Type
Type is considered a 2D object. Which means it’s two dimensional. It lies flat on a document (image or scrapbook page) with no shadow.

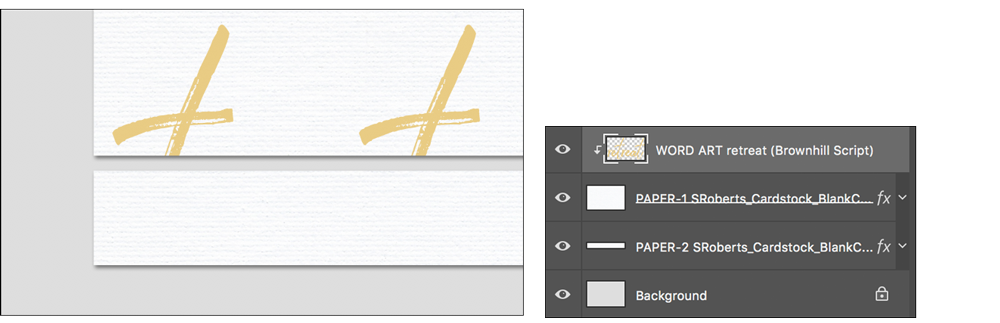
Because type does not contain a shadow, it shouldn’t ever travel across the edge of an object with 3D properties, such as a strip of paper. Why? Because as you can see in the image below, the shadow of 3D object is lost below the 2D object.

A Quick and Easy Solution for Traveling Type
In this tutorial I’ll show you the quick and easy steps for manipulating the Layers panel when you need type to travel across a 3D object. Can you see the difference in the image above and the image below? Let me show you how it’s done.

Step One: Open a Document
To complete this tutorial, the requirement is a document that contains a 2D layer (like word art) and at least one shadowed layer (like paper).
- Download my practice template that includes the word art and two shadowed paper layers, or open a document that contains the requirements.
NOTE: This particular technique for traveling type works best with lighter colored titles.
NOTE: The WORD ART layer in my practice template could be replaced by anything with 2D properties, such as a regular type layer, an overlay, or paint.
Here is a screen shot of the practice template and a screenshot of the Layers panel.

Step Two: Create Multiple Copies and Clip Them Down
As stated before, the problem is that the 2D word art is traveling across the edge of shadowed paper layers. That’s a no-no unless you know this quick Layers panel trick.
First, clip the word art to one of the paper layers.
- In the Layers panel, click on the WORD ART layer to activate it.
- In the Menu Bar, choose Layer > Create Clipping Mask.
Next, clip a copy of the word art to any additional paper layers that it travels over.
- In the Layers panel, hold down the Alt key (Mac: Opt key) and click and drag a copy of the WORD ART layer above the PAPER-2 layer.
- In the Menu Bar, choose Layer > Create Clipping Mask.
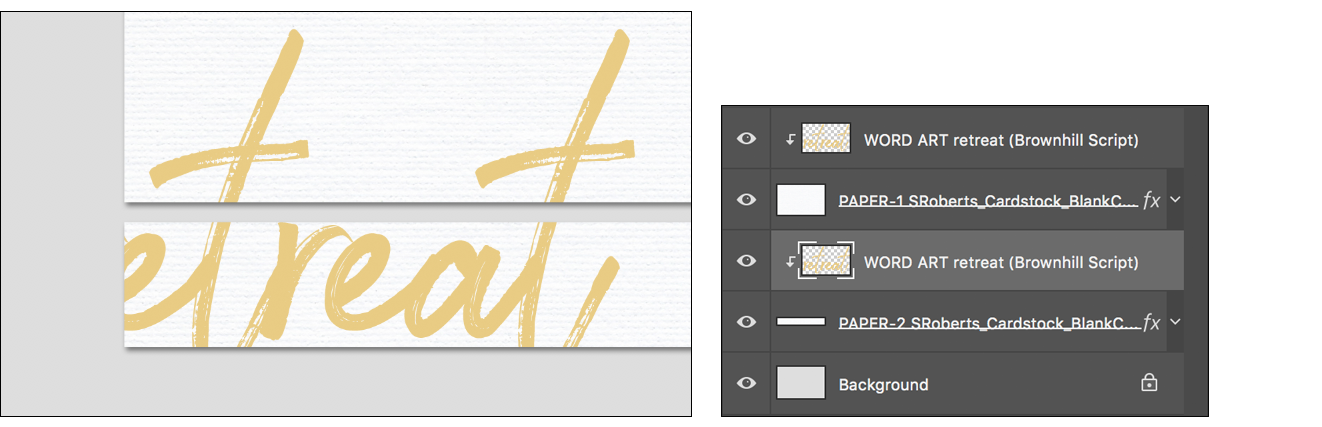
Finally, place a copy of the word art below all the clipped layers.
- In the Layers panel, hold down the Alt key (Mac: Opt key) and click and drag a copy of the WORD ART layer directly under the PAPER 2 layer.

Step Three: Move the Word Art Independently
This technique is non-destructive, meaning that whatever you have clipped down can still be moved.
- In the Layers panel, click on the top WORD ART layer to activate it.
- Hold down the Ctrl key (Mac: Cmd key) and click on any additional word art layers you created. Now all the word art layers should be active.
- Get the Move tool.
- On the document, click and drag directly on the word art to move it.

Here is the scrapbook page I made using this technique. If you are interested in learning additional design no-no’s for digital projects, check out the Design Beautiful Pages class.
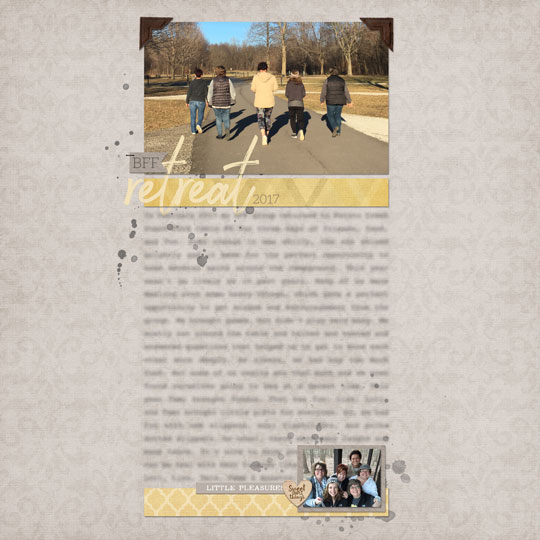
Page: BFF Retreat 2017 by Jen White
Photos: Jen White
Template: QwikLearn | Design Beautiful Pages
Kit: Simple Joys by Anita Designs
Fonts: Aleo, Brownhill Script
After posting your results online,
return here and include the link in the comments.

_____________________________________________
 Author: Jen White | Contact Us
All comments are moderated.
Please allow time for your comment to appear.
5 Responses
Shirley Kimbrough
You are continuously enriching our digital scrapping skills with your teaching expertise. You have always had my admiration and love. Thanks for another tutorial for this sticky and troublesome dilemma – 2D object over 3D object. So cool. 🙂
Diane
Thanks, Jen! I try to be careful about having text not go over shadowed layers but now I don’t have to worry. Thanks again!
Carol
Love you guys for always raising our skills a level higher – or finding solutions to tricky problems. AND you always teach us with steps that help us understand. Some very skilled people don’t have that ability and assume the listeners have the same knowledge base. Thank you. <3
Lillias
This is the first time I’ve seen anything like this. I look forward to trying this out. Thank you.
Kasuku
I’ve always wondered how that is done. …Thanks, Jen!!! You seem to read my mind!
Kasuku