
Rainbow with Polar Coordinates
by Jen White
Use the Polar Coordinates Filter to expertly bend rays of color to form a custom designed rainbow. Will it lead to legendary treasure? We shall see!
For this tutorial you will need:
- Photoshop Elements or Adobe Photoshop
Step One: Prepare Your Workspace
- Create a new 8×8 inch document (File > New > Blank File) at 300 ppi with a white background. (PS: Choose File > New.)
NOTE: You can begin this tutorial on an existing document by clicking on the topmost layer in the layers panel to activate it.
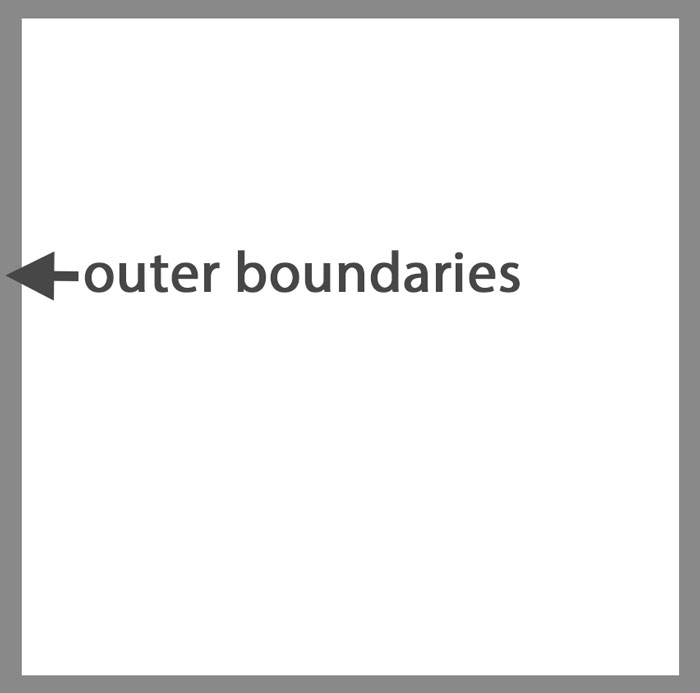
- Press Ctrl – (Mac: Cmd -) to zoom out so that you can see outside the boundaries of the document.
NOTE: You may need to doc (not float) your document.
Step Two: Create a Strip of Color
- Get the Brush tool.
- Photoshop Elements: In the Tool Options, open the Brush Picker. Open the dropdown menu and choose Default Brushes. Choose a Hard Round brush. Set the Size to 100 px and the Opacity to 100%. Open the Brush Settings and set the Spacing to 10%.
Adobe Photoshop: In the Tool Options, open the Brush Picker. Choose a Hard Round brush from Legacy Brushes > Default Brushes. Set the Size to 100 px. Set the Mode to Normal, the Opacity to 100%, and the Flow to 100%. Click on the Brush panel icon to toggle it open. In the Brush panel, set the Spacing to 10%. In the Tool Options, click on the Brush panel icon again to toggle it closed.
NOTE: Don’t be afraid to experiment with different brushes and brush sizes.
- Click on the Foreground Color Chip to open the Color Picker.
- In the Color Picker, choose the first color for your rainbow and click OK. I’m using Hex #1b2e56.
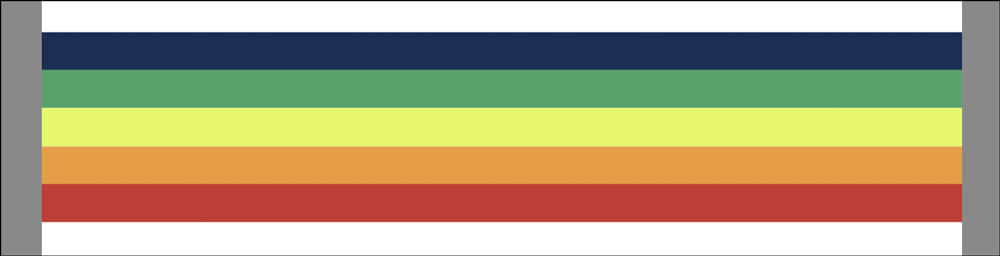
NOTE: For my example rainbow, I’m using a set of color swatches found at Color.Adobe.com/Explore. The Hex #s for these swatches are as follows: 1b2e56 (blue), 5aa169 (green), e5f66c (yellow), e69d48 (orange), and bc3f38 (red).

- In the Layers panel, click on the Create a New Layer icon.
- Double click directly on the name of the new layer and rename it BLUE.
- On the document, hold down the Shift key and click and drag from outside the left side of the document to outside the right side of the document.

Step Three: Duplicate and Recolor the Strip
- Press Ctrl J (Mac: Cmd J) to duplicate the BLUE layer.
- In the Layers panel, double click directly on the name of the duplicate layer and rename it GREEN.
- Click on the Foreground Color Chip to open the Color Picker.
- In the Color Picker, choose the second color for your rainbow and click OK. I’m using Hex #5aa169.
- Press Shift Alt Backspace (Mac: Shift Opt Delete) to fill the duplicate strip with that color.
- Get the Move tool.
- Press the Down Arrow key until the second strip is fully below the first strip.

- Repeat Step Three for any remaining stripes you wish to add.
Here’s the specific data for my remaining 3 stripes.
- Third stripe: renamed YELLOW, Hex #e5f66c.
- Fourth stripe: renamed ORANGE, Hex #e69d48.
- Fifth stripe: renamed RED, Hex #bc3f38.
Step Four: Apply the Polar Coordinates Filter
- In the Layers panel, click on the top strip layer to activate it.
- Holding down the Shift key, click on the bottommost strip layer. Now all strip layers should be active.
- In the Menu Bar, choose Layer > Merge Layers.
- Choose Filter > Distort > Polar Coordinates.
- In the dialog box, click on Rectangular to Polar and click OK.

Step Five: Cut the Circle in Half
- Get the Rectangular Marquee tool.
- In the Tool Options, click on the New Selection icon. Set the Feather to 0 and the Aspect to Normal. (PS: Set the Style to Normal.)
- On the document. click and drag a selection outline around the bottom half of the circle. To reposition while dragging, hold down the Space bar.
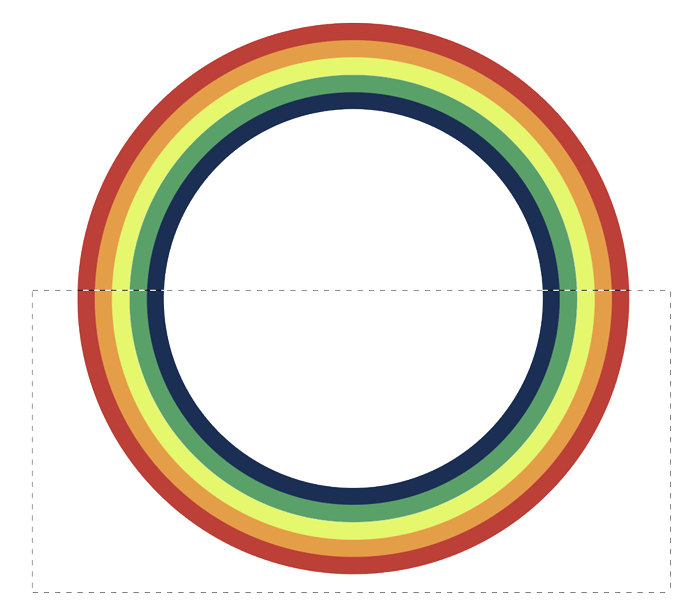
- Press the Backspace key (Mac: Delete key) to delete the selected area of the circle.
- Press Ctrl D (Mac: Cmd D) to deselect.

Step Six: Crop and Save the Rainbow
- In the Layers panel, double click on the thumbnail of the rainbow layer to get a selection outline around it.
- In the Menu Bar, choose Select > Modify > Expand.
- In the dialog box, Expand By 5 px and click OK.
- In the Menu Bar, choose Image > Crop.
- Press Ctrl D (Mac: Cmd D) to deselect.
- In the Layers panel, click on the Visibility icon of the Background layer to hide it.
- Save the rainbow(File > Save As) as a flat PNG image to retain transparency.
- Close the working document without saving.
Experiment with Settings
In Step Two I encouraged you to experiment with different brushes. Do that, but also try different sizes of brushes and experiment with the spacing between the stripes in your document before running the filter. Here are some variations I came up with.
Rainbow – Soft Round Brush
If you use a soft round brush to create the strips, the colors will look more blended. To get the soft bottom edge, set the Feather to 5 px in Step Five.

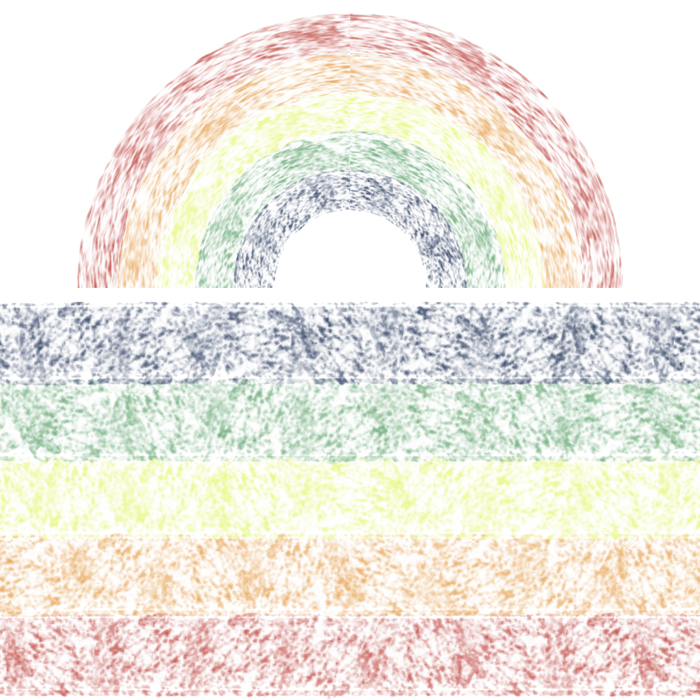
Rainbow – Dry Brush
For this example I used the Dry Brush from the Default Brushes. Notice that the size of the brush was much bigger when I created the strip. Bigger brush strips will result in a thicker rainbow.
Just Imagine!
Can you imagine how many different variations of this technique could be applied? What do you think you could create using different colors and different brushes? I can only imagine!

Credits:
Page: Stetson’s First Rodeo by Jen White
Photos: Jen White
Kits: Charming by KimB Designs, Winter Bliss by Kristin Cronin-Barrow
Fonts: Amber Whiskey, DJB Annalise

The fastest way to learn Photoshop Elements or Adobe Photoshop.
Save 15% on QwikLearn Photoshop Elements
Save 15% on QwikLearn Photoshop
_____________________________________________
 Author: Jen White | Contact Us
All comments are moderated.
Please allow time for your comment to appear.
7 Responses
Ruth Everson
In the past, I’ve been able to save these tutorials on Pinterest, but that option is no longer available. Wondering if there is an explanation. I try to save all the tutorials in any way I can.
Jen White
I see what you mean, Ruth. A share box used to follow you down the tutorial and it’s no longer there. I’ll look into that. But, for now, know that you can add a Pinterest plugin to Chrome that allows you to share anything you come across. https://chrome.google.com/webstore/detail/pinterest-save-button/gpdjojdkbbmdfjfahjcgigfpmkopogic?hl=en
Hope that helps!
Olga Litvin
Surprisingly simple! Thank you so much for this tutorial!
Carolyn
Thank you so much!
Vivian
Amazing! thanks for this tutorial.
Kathy Ryman
Polar Coordinates! Who knew!!! Thanks!
Joanne
What a brilliant tutorial!! I am learning so much. Thank you