
Paper Makeover with the Graphic Pen Filter
by Jenifer Juris
Make the most out of your patterned papers by giving them a makeover using the graphic pen filter.
For this tutorial you’ll need:
- A patterned background paper
- Photoshop Elements or Adobe Photoshop
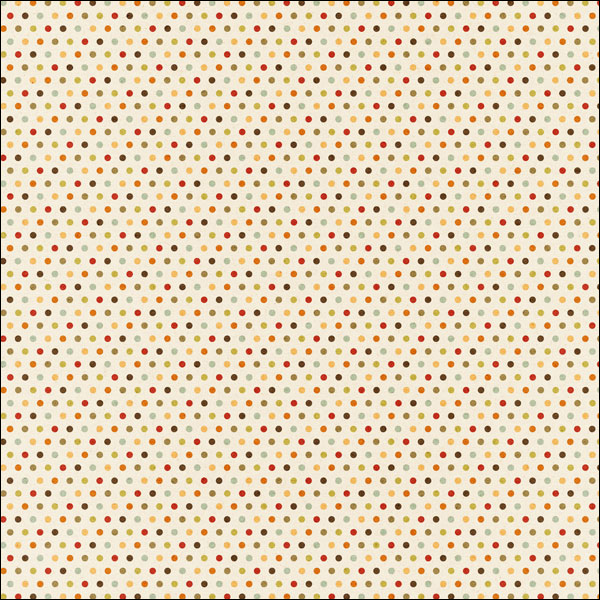
To follow along exactly, download paper I’m using here.
Step One: Prepare the Workspace
- Open a patterned background paper (File > Open).
- In the Menu Bar, choose File > Duplicate to create a copy. Click OK. (Photoshop: Choose Image > Duplicate.)
- Close the original paper document.
Step Two: Choose your Colors
- Click on the Foreground Color Chip to open the Color Picker.
- In the Color Picker, pick whatever color you’d like to use for the polka dots. I’m using pure white. Click OK.
- Click on the Background Color Chip to open the Color Picker.
- In the Color Picker, pick whatever color you’d like to use for the main portion of the paper (opposite of the polka dots). I’m using a light blue which is Hex #: e1ebf2. Click OK.
Step Three: Run the Filters
- In the Menu Bar, choose Filter > Filter Gallery.
- In the Filter Gallery dialog box, click on the Sketch folder to toggle open the Sketch options.
- Click on the Graphic Pen Sketch filter.
- Set the Stroke Length to 8, the Light/Dark Balance to 50, and the Stroke Direction to Left Diagonal.
- At the bottom right of the Filter Gallery dialog box, click on the New Effect Layer icon.
- Click on the Texture folder to toggle open the Texture options.
- Click on the Texturizer Filter.
- Set the Texture to Canvas, the Scaling to 133%, the Relief to 2, and the Light to Top Left.
- Click OK.
NOTE: In the Filter Gallery dialog box, make sure the filter layer Visibility icon is turned on. If it’s not, the filters you run won’t be visible.

More Examples:
Here’s another example where I used this paper. This is the paper before:
I used all of the same settings as above except I changed the Background Color to Hex #: fcddea. Here’s how it looks after:

Here’s one more example where I used this colorful patterned paper:
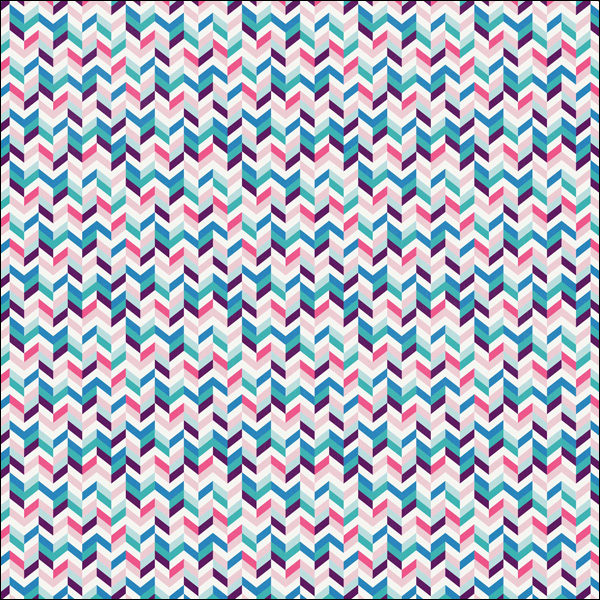
And using the same settings as before and only changing the Background Color to Hex #: e7e1da, here’s how it looks after:
There are so many different ways you can use this technique to make your own beautiful backgrounds. Have fun experimenting!
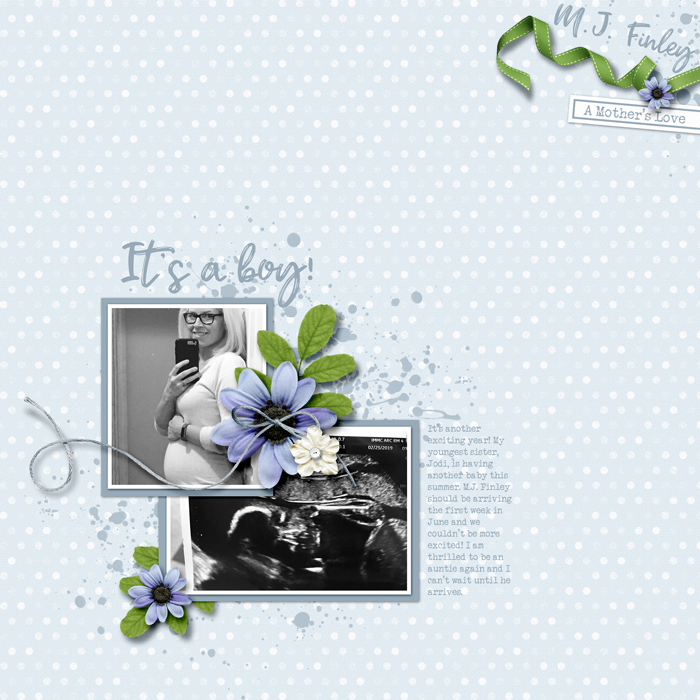
Here’s how I used the first paper I made in a scrapbook page:
And here’s how I used the third paper I made to create a thank you card:

Credits:
Page: Jenifer Juris
Photos: Jodi Finley (sister)
Kit: A Mother’s Love by Kristin Cronin Barrow
Extras: Polka Dot Paper from Autumn Days by Kristin Cronin Barrow
Fonts: Shanky, Veteran Typewriter
Card: Jenifer Juris
Kit: Stories 365 by Kristin Cronin Barrow
Extras: Colorful Chevron Paper from New Years Celebration by Just Jaimee
Fonts: Beverly Hills, Didot
Green & Cream Paper from Autumn Days by Kristin Cronin Barrow


Whether you’re just getting started in digital scrapbooking or are self taught and want to fill in the gaps in your education, our QwikLearn Photoshop and Photoshop Elements classes will help you get up to speed FAST and become the confident, competent digital scrapbooker you desire to be.
This self-paced class will take you where you want to go and is available for Photoshop Elements 11 to 2018, and Photoshop CS6 through Creative Cloud.
Learn more about QwikLearn Photoshop Elements class or QwikLearn Photoshop class!
Use Coupon Code LEARN25 at checkout to save 25% off the full price of the class. Cannot be combined with any other discount.
_____________________________________________
 Author: Jenifer Juris | Contact Us
All comments are moderated.
Please allow time for your comment to appear.
20 Responses
Margaret
I really would love to use this for my papers! But, even though I had 2 different colors picked on my “color chips”, my paper just turned into a single colored page of the background color – the graphic on the paper disappeared. In your instructions you say to “make sure the filter layer Visibility icon is turned on” but I have no idea where you turn this on or off so maybe that’s why my graphic disappeared. Can you help? Thank you!
Jenifer Juris
I’m going to email you. We’ll get you sorted out! 🙂 But I’ll list a few things here for you to check so anyone else who might be struggling can see them. First of all, The Filter Gallery has a sort of filter layers panel. It’s the bottom right half of the filter gallery dialog box. This is where each filter is listed and beside each filter is an eyeball which is the Visibility icon.
A few things could be happening. 1. If you run the graphic pen filter twice on accident (you’ll see it listed twice in the filter layers), this will create a solid textured paper. 2. If the paper you’re using is low in contrast or number of colors (think tone on tone pattern), this filter will not be very visible. 3. Also, check again to make sure the Visibility icon of the Graphic Pen filter is turned on.
I will email you a picture to show you what to look for but I hope this helps! 🙂
Jessica Trotter
Oh, this was GREAT! I see so many things I can do now! Thank you!
Jenifer Juris
Thank you SO much! 🙂
Beverly
This is a great technique. Thanks for the tutorial.
Jenifer Juris
Thanks! 🙂
Kristy
Thank you!!!! This is fantastic! I did not have a canvas texture listed under the textures. I only have Crquelure, Grain, Mosaic, Patchwork, Stained, and Texturizer. Should I have more? I am using PSE 2019.
Jenifer Juris
Kristy, once you click on Texturizer, the Canvas option should be listed there. If not, please email me. I did these steps with PSE 19 so it should work…
Jenifer Juris
Also, the Texture option drop down box is JUST under the drop down box that says Texturizer…
Catherine
good tutorial Jen
Jenifer Juris
Thx! 🙂
Kathy Black
Awesome tutorial Jen!
Jenifer Juris
Thanks so much!! 🙂
Barbara
Fantastic tutorial thanks so much for making me want to pull up the program and experiment!
Jenifer Juris
I’m so glad you’re having fun with it. The options really are endless. 🙂
KATHY RYMAN
Mind blown! Like Lori (previous comment), I also have been using Photoshop Elements for years! I feel like there must be so much more I had no idea was even possible! What would I do without you guys!!?!
Jenifer Juris
I’m so glad you love the tutorial! 🙂
Coralie
This is fabulous, Jenifer. As I am not very creative, I would love to see more of what you can do with this Graphic Gallery.
Thank you
Lori
WOW! I have been digi-scrapping and using Photoshop forever and I had no idea about this technique. I feel like this is going to be a total game changer–no more searching endlessly for the “right” colors in a patterned paper! Thank you for these details and examples. Please check the “Download PDF” button–I am getting a 404 page not found message and I’d very much like to save these instructions. Thank you again.
Jenifer Juris
Hi Lori! Thanks for the heads up – we should have the PDF link fixed by the end of the day! 🙂 I’m so glad you are enjoying the tutorial!! 🙂