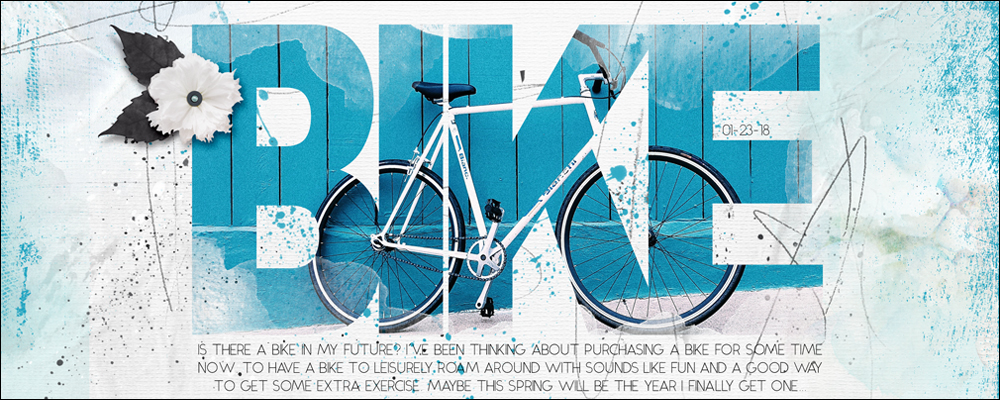
Do you want to make a BIG statement? Using the letter mask technique will help you do just that!
Step One: Prepare a Document
- Create a new 12×12 document (File > New > Blank File) at 300 ppi with a white background. (PS: Choose File > New.)
- Press the letter D to reset the color chips to the default of black over white.
Step Two: Add Type
This tutorial works best with words that are 4 to 5 letters. The letters within the word you use will also matter. Using a big, block style, sans serif font is important.
Step two is different for Photoshop and Photoshop Elements.
Photoshop Elements Only:
(Scroll down for Adobe Photoshop steps.)
- Press Ctrl K (Mac: Cmd K) to open Preferences.
- Click on Type to access the Type Options.
- Click the checkmark to Show Asian Text Options and then click OK.
- Get the Horizontal Type tool.
- In the Tool Options, open the Font Picker and choose a big, blocky, sans serif font. Set the size to 250 pts and the Alignment to Center.
Note: The font I’m using is Arial Black Regular. Other good font choices are Helvetica Neue Condensed Black or Impact.
- On the document, click once in the middle of the document and type a word in all capital letters. I’m using the word BIKE.
- Click the checkmark to commit.

- In the Horizontal Type tool options, open the Asian Text drop-down menu, open the Tsume drop down menu, and choose 90%.
The letters of your word should be much closer together.
NOTE: The Tsume percentages will not effect all fonts. If it does not effect the font you are using, try using a different one.

- Press Ctrl T (Mac: Cmd T) to get the Transform options.
- In the Tool Options, uncheck Constrain Proportions.
- In the Tool Options, change the Height to 150%.
- Click the checkmark to commit the changes.
At this point, if you prefer to not see the Asian Text options in your Type tool options, go back to Preferences and uncheck Show Asian Text Options.

Step two is different for Photoshop and Photoshop Elements.
Adobe Photoshop Only:
(Scroll up for Photoshop Elements steps.)
- Get the Horizontal Type tool.
- In the Tool Options, open the Font Picker and choose a big, blocky, sans serif font. Set the size to 250 pts and choose Center Alignment.
Note: The font I’m using is Arial Black Regular. Other good font choices are Helvetica Neue Condensed Black or Impact.
- On the document, click once in the middle of the document and type a word in all capital letters. I’m using the word BIKE.
- Click the checkmark to commit.
- In the Tool Options, click on the Character panel icon.
- In the Character panel, set the Tracking to -140 and the Vertical Scale to 150%.
Note: If you use a different font, you may have to adjust the size and tracking of the font accordingly.
Step Three: Open a Photo
- Open a photo (File > Open).
- Get the Move tool.
- While holding down the Shift key, click and drag the photo onto the type document and then let go.
Step Four: Create Clipping Mask
- In the Menu Bar, choose Layer > Create Clipping Mask.
- At this point, you may need to move and/or transform the size of your photo to make it fit within the letters.

Finishing Touches
Whether you decide to use this on a poster, a greeting card, or a scrapbooking page, this technique adds a big visual statement to your project. Because of that, anything else you add to the project should be on the simple side so that your letter masked word stays the shining star.
Here’s my finished project:
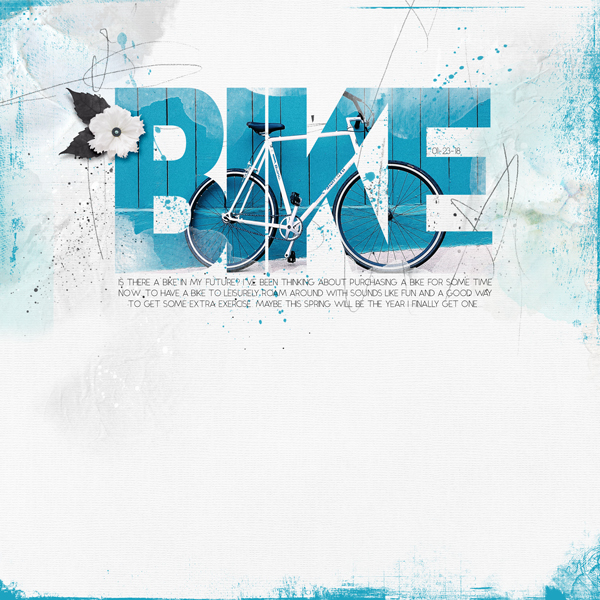
Credits:
Page & Tutorial: Jenifer Juris
Photo: Carl Nenzen Loven on Unsplash
Kit: APP Beautiful Day by Anna Aspnes
Extras: Flower from A Day at the Spa by Anita Designs, Leaves from New Years Celebration by Just Jaimee, Edges from Distressed Korners and Edges 11 by Anna Aspnes
Font: Alcubierre

The fastest way to learn Photoshop Elements or Adobe Photoshop.
Save 15% on QwikLearn Photoshop Elements
Save 15% on QwikLearn Photoshop
_____________________________________________
 Author: Jenifer Juris | Contact Us
All comments are moderated.
Please allow time for your comment to appear.
7 Responses
Shirl/Grambie
Love the funky font. Thanks for the PDF. (I am not getting emails except for classes.)
Adelle Austin Fourie
Thank you, awesome to learn something new!
Jenifer Juris
You’re welcome! 🙂
Stephanie
I have a font called Fillmore Regular, which is a little funky, but gives a nice space to fill with a photo.
Thanks for the fun tutorial.
Jenifer Juris
You’re welcome! 🙂
Terri
What an awesome tutorial! I am always looking for ideas for using type. thanks Jenifer!
Jenifer Juris
Thanks so much! I’m glad you liked it! 🙂