
-
Photoshop Elements v15 (or later) or Adobe Photoshop CS6 (or later)
-
A chunky font, I recommend Impact Regular
NOTE: This tutorial is written using groups. Groups were first introduced in Photoshop Elements 15. Versions earlier than PSE15 are no longer supported.
Step One: Prepare Your Workspace
-
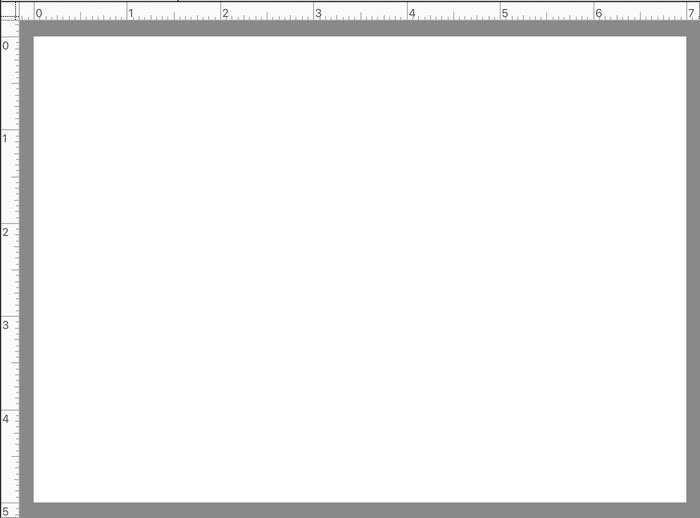
Create a new 7 x 5 inch landscape document (File > New > Blank File) at 300 ppi with a white background. (PS: Choose File > New.)
-
In the Menu Bar, choose View and place a checkmark next to Rulers.
-
Press the letter D to reset the Color Chips to the default of black over white.
-
Press Ctrl 0 (Mac: Cmd 0) to fit the document to your viewing area.
Step Two: Add the Bottom Shape
-
Get the Custom Shape tool.
-
In Photoshop Elements Only:
-
In the Tool Options, open the Shape Picker and choose the Hexagon shape. If you don’t see the Hexagon shape, open the dropdown menu and choose Shapes. Then open the flyout menu and choose Large List.
-
Set the Style to None. The Color Chip should be black. Open the Geometry Settings and choose Fixed Size. Set the Width to 15 in and the Height to 13 in. Check From Center. Click on the New Shape Layer icon.
-
-
In Adobe Photoshop Only
-
In the Tool Options, set the Tool Mode to Shape, the Fill to Color, and the Stroke to None. Open the Path Operations and choose New Layer. Open the Geometry Settings and choose Fixed Size. Set the Width to 15 in and the Height to 13 in. Check From Center.
-
Open the Shape Picker and choose the Hexagon shape. If you don’t see the Hexagon shape, open the flyout menu and choose Large List. Then, open the flyout menu again and choose Shapes. Click OK to replace the current shapes.
-
-
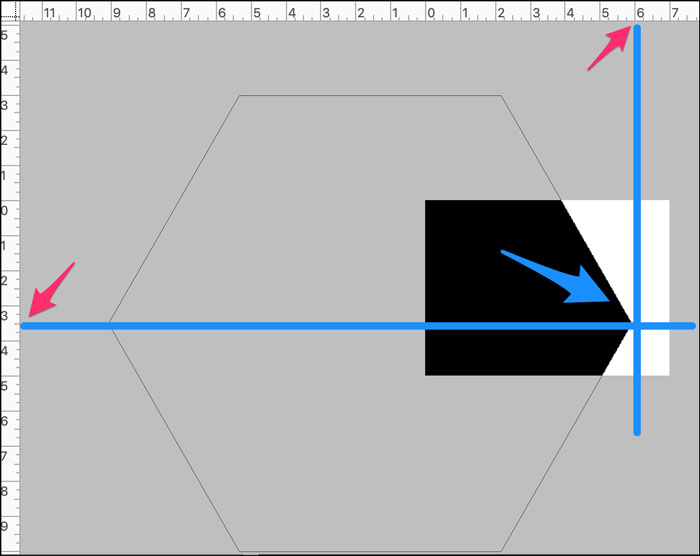
Press Ctrl – (Mac: Cmd -) three times to zoom out on the document
-
On the document, click and drag to place the right-most point of the hexagon at the 6 x 3.5 mark. See the screenshot below.
Step Three: Add the Last Letter in the Word
- Press Ctrl + (Mac: Cmd +) two times to zoom back in on the document.
- Get the Horizontal Type tool.
- In the Tool Options, open the Font Picker and choose Impact Regular. Set the Size to 100 pt. Click on the Color Chip and choose gray. (PS: Also click OK to close the Color Picker.) Click on the Left Align icon.
Note: I’m temporarily setting the type color to gray so that it contrasts to the black shape.
-
On the document, hold down the Shift key and click to the right of the point of the hexagon to place the cursor.
-
Type a lowercase S. Do not commit the type.
-
Hold down the Ctrl key (Mac: Cmd key) and click and drag inside the bounding box until the right side of the S is aligned with the rightmost point of the hexagon. See the screenshot below.
-
Click the checkmark to commit.

Step Four: Trim the Shape
-
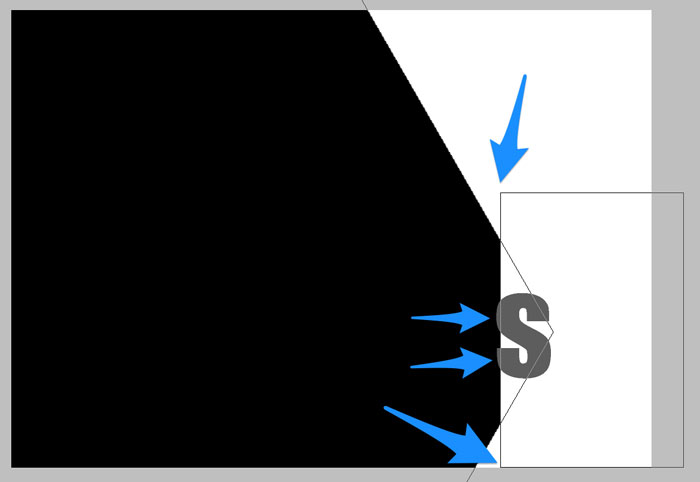
In the Layers panel, click on the shape layer to activate it.
-
Get the Rectangle tool.
-
In Photoshop Elements Only:
-
In the Tool Options, set the Style to None. Open the Geometry Settings and choose Fixed Size. Set the Width to 2 in and the Height to 3 in. Check From Center. Uncheck Snap. Click on the Subtract Front Shape icon.
-
-
In Adobe Photoshop Only:
-
In the Tool Options, set the Tool Mode to Shape, the Fill to Color, and the Stroke to None. Open the Path Operations and choose Subtract Front Shape. Open the Geometry Settings and choose Fixed Size. Set the Width to 2 in and the Height to 3 in. Check From Center.
-
NOTE: If you’re not sure which icon is Subtract Front Shape, make sure your Tool Tips are turned on in Preferences. Then when you hover over an icon, the name of the icon will be displayed.
- On the document, click and drag the rectangle so that a small sliver of the S is outside the left edge of the rectangle AND the top-left and bottom-left of the rectangle are outside the boundaries of the hexagon. See the screenshot below. To reposition while dragging, press and hold the Space bar.
Step Five: Set the Color of the Letter to Match
-
In the Layers panel, double click on the thumbnail of the type layer to highlight the letter and get the Horizontal Type tool Tool Options.
-
In the Tool Options, click on the Color Chip and choose black. (PS: Also click OK to close the Color Picker.)
-
Click the checkmark to commit.

Step Six: Group the Layers
-
In the Layers panel, hold down the Shift key and click on the Shape layer. Now the Type layer and Shape layer should be active.
-
Click on the Create a New Group icon.
-
Double click directly on the name of the new group and rename it S.
Note: There should be no visible change to the document.
Step Seven: Add a Drop Shadow
-
In Photoshop Elements Only:
-
In the Menu Bar, choose Layer > Layer Style > Style Settings.
-
In the Style Settings dialog box, set the Lighting Angle to 120. Click to check Drop Shadow. Set the Size to 24, the Distance to 12, and the Opacity to 50%. Click OK.
-
-
In Adobe Photoshop Only:
-
In the Menu Bar, choose Layer > Layer Style > Drop Shadow.
-
In the Layer Styles dialog box, set the Blend Mode to Multiply, the Opacity to 50%, the Angle to 120, the Distance to 12, the Spread to 0, and the Size to 24. Click OK.
-

Step Eight: Create Additional Layers
Follow these instructions for creating the remaining letter groups for the card.
-
Press Ctrl J (Mac: Cmd J) to duplicate the current group.
-
In the Layers panel, double click directly on the name of the duplicate group and rename it. I’m spelling Thanks backward, so I’ll rename my group K.
-
Click on the arrow to open the new group.
-
Double click on the thumbnail of the type layer, then in Tool Options, click on the Color Chip and choose a dark gray. (PS: Click OK to close the Color Picker after choosing a dark gray.) Type a new letter and click the checkmark to commit.
Note: The color of the shape/letter does not really matter. What is important is that the color contrasts (is visually set apart from) the previous group.
-
Double click on the thumbnail of the shape layer to open the Color Picker.
-
On the document, click to sample a color from the new letter and click OK to close the Color Picker.
-
Click on the arrow to close the new group.
-
Get the move tool.
-
Press the Left Arrow key to nudge the new group to the left until the right edge of the new letter is aligned with the left edge of the previous letter. See the screenshot below.

- Repeat Step Eight for each of the additional layer groups.
- If you save your card as a template, you can reuse it over and over for different words by changing the type layers in the Layers panel.
- Turn off the Visibility icon to hide groups you don’t want to use.
- Use a phrase (small string of words) instead of a single word. It will work similar to a hashtag. People nowadays are used to reading phrases with no spaces.

(OPTIONAL) Step Nine: Resize and Reposition the Groups
-
In the Layers panel, click on the top group to activate it.
-
Hold down the Shift key and click on the bottom group. Do not activate the Background layer. Now all six groups should be active.
-
Press Ctrl T (Mac: Cmd T) to get the Transform options.
-
To reposition the groups, click and drag inside the bounding box.
-
To resize the groups, change the Width percentage in the Tool Options.
-
Click the checkmark to commit.
I made my groups much larger so that they nicely filled up the 5×7 card background.

Step Ten: Save the Layered Thanks Template
Saving the document as a layered grayscale template will allow you to use it over and over again with different papers and elements for a completely different look.
NOTE: Normally I would have you crop your document before saving in order to decrease its file size. But since all the layers in the document are vector, the shapes that are extending past the boundaries of the document are not going to cause a big rise in the files size of the document.
-
Save the template (File > Save) as a layered PSD document with a unique name. I named mine “template-layered-thanks-card.psd” and saved it in my card templates folder on my computer.
Step Eleven: Use the Card Template
Using this template is a GREAT opportunity to use paper packs that you love.
-
Open the saved card template (File > Open).
-
In the Menu Bar, chose File > Duplicate. (PS: Choose Image > Duplicate.)
-
In the dialog box, click OK.
-
Close the original.
Tips for Choosing Papers
-
Choose a set of papers from a single kit.
-
Use all solid papers or all patterned papers.
-
If using patterned papers, alternate highly contrasting papers to make the groups easily recognizable
Clip a Paper to a Group
To stay better organized and not get confused, I recommend starting with all groups closed.
-
In the Layers panel, click on a group to activate it.
-
Open a paper (File > Open).
-
Get the Move tool.
-
Holding down the Shift key, click and drag the paper onto the template.
-
In the Menu Bar, choose Layer > Create Clipping Mask.
-
Transform the paper as needed.
Here are a couple cards I created using this tutorial.


FREE Tent Card Template Set
When you share your digital cards and layouts in online galleries, two things are bound to happen—you will be encouraged and your followers will be inspired.
Use this exclusive Tent Card Template Set to display your next greeting card in style. This FREE set includes:
- Two 4×6 Tent Card Templates — one landscape, one portrait
- Two 5×7 Tent Card Templates — one landscape, one portrait
- Step-by-step instructions for using the templates and preparing them for web display
- Two flattened JPG greeting cards for your personal use
Note: To access this free template set, you will need to login into QwikLearn and be enrolled in our FREE Fundamentals class.
Get the Set in our FREE Fundamentals class in our QwikLearn classroom.
More inspiration using this tutorial:

Photo, Page & Title Template: Terri Fullerton
Template: Katie Pertiet Studio DD-Layer Worsk No 599
Kits: Katie Pertiet Blue Skies, Astro, Bunny Slope Blue
Anna Aspnes Art Play Sun Fun
Fonts: Veteran Typewriter, Telegraphem, Impact
_____________________________________________
![]() Author: Jen White | Contact Us
Author: Jen White | Contact Us
All comments are moderated.
Please allow time for your comment to appear.
19 Responses
Anke
What an amazing tutorial, how did you ever think that up?? I love it!!
BL Wild
Well, here it is August 2020 and I want that tutorial!! I am so thankful to Digital Scrapper for having all these materials handy for us waaaaay after they are first published. I now will have a printed version of this one! Thank you,
BL
Jen White
You are very welcome, BL!!
Karen
Thank you!
Margaret
Thank you! Love this tutorial! I can see that this is one I will use often.
Would you consider adding instructions on how to add a stroke outline to the letters to the tutorial and PDF? Sometimes, depending on the papers or the letters (h,k) used, the letters seem to need a little more definition. I’d love to see a video, too (but have to say the written instructions are quite clear). Love how y’all teach!
Jen White
Hi Margaret. If you’d like to add a stroke, I’d recommend applying a stroke layer style to each group. I won’t be adding specific instruction, however. Sorry. Hope this helps!
Sheri
That is so pretty! I am having a hard time fellowing especially the workspace isn’t the same as yours. Could it be possible to create a video?
Thank you!
Sheri
Jen White
Thanks, Sheri! There may be a video added later. If you have specific questions, let me know and I can try to help.
Glori
WOW, fabulous freebies!! THANK YOU!!
Judy Mac
Thanks for this great tutorial. Can use it in so many ways!!! All of your tutorials are awesome
Jen White
Thanks, Judy! Looking forward to seeing what you create.
Nannette Dalton
This is great Jen. LOVE IT.
akrubygal
so nice…..thank you!!
Steph
I love the look of this card – thanks for sharing it with us!
Barbara
Fun project thanks for sharing.
Faa Ahmed
Love this, thanks Jen!!
Nell Covington
Love this card idea. So cute. Thanks for sharing.
Kathy
The card is way too cute!! Thank you Jen!!
Gail R.
Thank you for this great tutorial – Love this template!