Popsicle Perfect
by Syndee Rogers-Nuckles
This summer my kids have been obsessed with Otter Pops, which are basically a long skinny frozen concoction in a plastic wrapper. When I was a kid, we didn’t really have anything like that. We had the more traditional shaped popsicles, or we would make our own using ice cube trays or Dixie cups. Boy, times have changed!
I thought it would be fun to create our own popsicle to add to a summertime layout or card!
In this tutorial I’ll show you how to create a traditional summer treat using the Rounded Rectangle tool and a magical Blend Mode. You won’t believe how quick and easy it is!
(Psst. Make sure to grab the free word art at the end.)
Step One: Prepare the Workspace
- Create a new 7 x 7 inch document (File > New > Blank File) at 300 ppi with a white background. (Photoshop: Choose File > New.)
- Get the Move tool.
- In the Tool Options, check Auto Select Layer and uncheck Show Bounding Box. (Photoshop: Uncheck Show Transform Controls.)
- Click on the Foreground Color Chip to open the Color Picker.
- In the dialog box, enter Hex Code #bdd95a or a color of your choosing. Click OK.
Step Two: Create the Popsicle
- Get the Rounded Rectangle tool.
- In the Tool Options, click on the Create New Shape Layer icon. Set the Radius to 0.9 inches and the Style to None. (Photoshop: Set the Tool Mode to Shape and the Path Operations to New Layer). Open the Geometry Options and choose Fixed Size. Set the Width to 2.203 inches and the Height 4.72 inches.
- On the document, click and drag slightly to create the shape.
- In the Tool Options, click Simplify. (Photoshop: In the Menu Bar, choose Layer > Rasterize > Shape.)

- Get the Rectangular Marquee tool.
- In the Tool Options, click on the Add to Selection icon. Set the Feather to 0 and the Aspect to Normal. (Photoshop: Set the Style to Normal.)
- On the document, click and drag to create a selection outline over the bottom of the shape, using the screenshot as a guide.
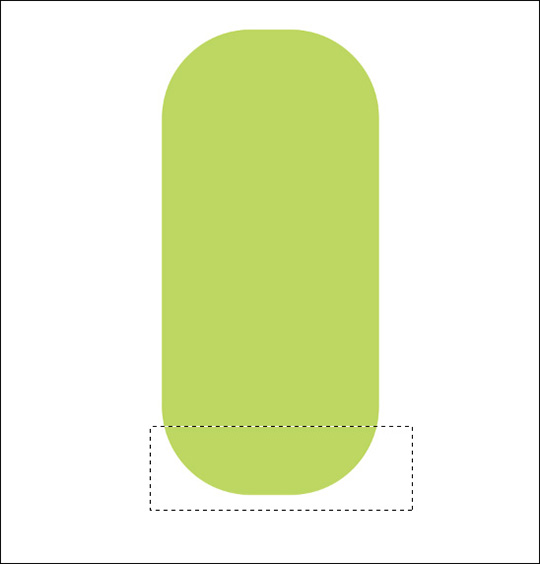
- Press the Backspace key (Mac: Delete key) to delete the selection.
- In the Menu Bar, choose Select > Deselect.
- Get the Rounded Rectangle tool.
- In the Tools Options, set the Width to 0.85 inches and the Height to 3.367 inches. (Photoshop: Open the Geometry Options to set the Width and Height.)
- On the document, click and drag to create the shape.
- In the Tool Options, click Simplify. (Photoshop: In the Menu Bar, choose Layer > Rasterize > Shape.)

- Get the Move tool.
- On the document, click on the new shape and drag it into position, using the screenshot as a guide.
- In the Layers panel, change the Blend Mode of the new shape layer to Color Burn.

- Press Ctrl J (Mac: Cmd J) to duplicate the layer.
- On the document, click on the duplicate shape and drag it into position, using the screenshot as a guide.

Step Three: Create the Popsicle Stick
- Get the Rounded Rectangle tool.
- Click on the Foreground Color Chip to open the Color Picker.
- In the dialog box, enter Hex Code #d7c081 and click OK.
- In the Tools Options, set the Width to 0.46 inches and the Height to 3.33 inches. (Photoshop: Open the Geometry Options to set the Width and Height.)
- On the document, click and drag to create the shape.
- In the Tool Options, click Simplify. (Photoshop: In the Menu Bar, choose Layer > Rasterize > Shape.)

- In the Layers panel, click on the popsicle stick shape layer and drag it to be below the popsicle base layer.
- Get the Move tool.
- On the document, click on the stick shape and drag it into position, using the screenshot as a guide.

Step Four: Save the File
- In the Layers panel, click on the Visibility icon of Background layer to hide it.
- Save the popsicle (File > Save As) as a PNG file in the location of your choice.
Your popsicle is now ready to add to a scrapbook page. As an added bonus, here is word art to make your popsicle extra summery. Download the word art FREE.

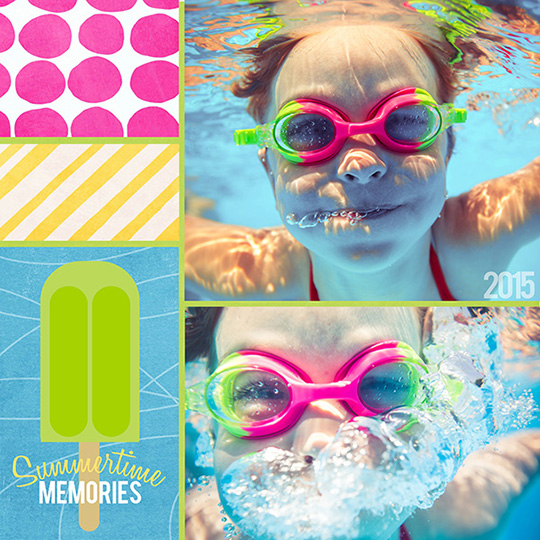
Here’s my finished layout after I’ve added the summery word art. I went for a clean and simple layout with bright summery colors.
I’m looking forward to seeing all your popsicle creations in Digi Scrap Tutorial Gallery.
Credits:
Page & Photo: Syndee Rogers-Nuckles, Sunny Studio
Kit: Hello Summertime by Digilicious Designs and Weekend at Home by Kate Hadfield
Fonts: Honey Script Light, Bebas
Software: Photoshop Elements 12, Adobe Photoshop CC 2014

Interested in digging in deeper?

Blended Overlay Video Tutorial
by Syndee Rogers-Nuckles
One of the most popular scrapbooking techniques is to blend photos, papers, and even embellishments into the page. It’s one of my favorite techniques and can be used on any style of layout, whether it’s artistic using paint or soft and pretty using florals and patterns.
In this lesson we are going to create a blended overlay using the Text and Gradient tools!
![]()
Say It Loud Video Tutorial
by Jen White
Obsessed with quotes and phrases? Me, too! My house, mind, and Pinterest pages are loaded with quotes and phrases that are SO ME.
Join me as I take some of that perfect verbiage from my heart to my scrapbook page—loud and proud.
![]()

Bokeh Overlay Video Tutorial
by Christina Rambo
Create a beautiful Bokeh Overlay to be used on photos or on background papers.
![]()
![]()
_____________________________________________
 Author: Syndee Rogers-Nuckles | Contact Us
All comments are moderated.
Please allow time for your comment to appear.
8 Responses
Anne Paske
Thank you for the yummy Popsicle and the pretty Word Art. It will be fun to use it!!!
Shirl
This is so cute. It’s amazing to see how one tool can create a wonderful time-true treat. Thanks for the tut. 🙂
Janine
What a sweet element!! Thank you so much – I will certainly use this cute popsicle frequently to scrapbook my grandchildren this summer. Thanks again for providing these fun extras for us.
Genie
thank you, great tutorial
Scrapgirl
This is so cool! Thank you Syndee for posting this tutorial. I love learning how to make elements, much appreciated.
Syndee Rogers-Nuckles
You are so welcome!
Cindy
Thank you for this tutorial! I love your layout, what cool underwater pictures!
Syndee Rogers-Nuckles
Thank you!!!