Folded Heart
by Syndee Rogers-Nuckles
The Burn tool is an often overlooked treasure. It can help add depth to a photo, image or element. It can create or deepen shadows, intensify textures, colors and more. The Burn tool is one of my ‘go to’ tools for taking embellishments I already have and transforming them into something new.
In this tutorial you will learn how to take a flat element such as a heart, and use the Burn tool to make one side appear folded up off the page.
Step One: Prepare the Workspace
- Open a layered card or scrapbook page (File > Open) on which you would like to use the heart.
- Press the letter D to reset the Color Chips to the Default of Black and White.
- Open a flat heart embellishment or other item you would like to appear folded (File > Open). I am using the paperheart1 from Amanda Heimann’s Carefree kit. You can download the heart here.

- Get the Move tool.
- Click and drag the heart onto your page or card.
Step Two: Add the Fold
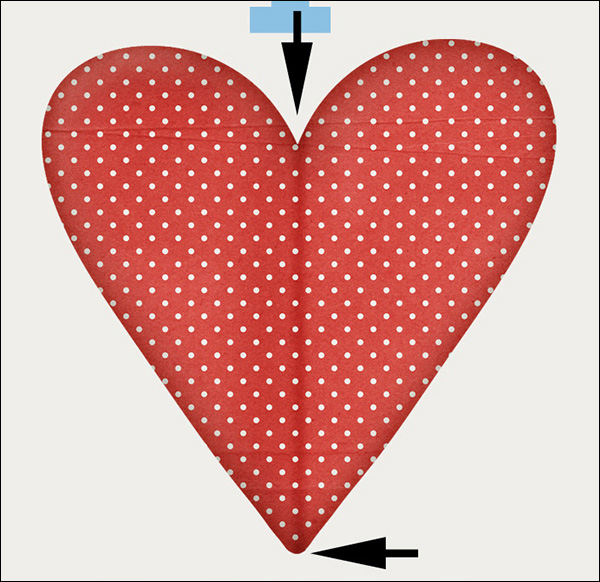
- Get the Burn tool. It’s nested with the Sponge tool.
- In the Tool Options, set the Range to Midtones. Open the Brush Preset Picker and choose a Soft Round brush. If you don’t see a Soft Round brush, open the Menu and choose Default Brushes. Set the Size to 45 px, and the Exposure to 75%.
- On the document, while holding down the shift key, right on top of the heart, drag with your mouse down the center of the heart to the bottom. Use the black arrows in the image below as a guide. This will create the illusion of a fold or crease.
Step Three: Create a Shadow Layer
- Press Ctrl J (Mac: Cmd J) to duplicate the heart.
- Press Alt Shift Backspace (Mac: Opt Shift Delete) to fill the pixels with the Foreground Color (Black).
- In the Menu Bar, choose Filter > Blur > Gaussian Blur.
- In the dialog box, set the Radius to 7.8 px. Click OK.
- In the Layers panel, set the Opacity to 36%.
Step Four: Modify the Shadow Layer
- In the Layers panel, move the shadow layer down below the heart layer.
- In the Menu Bar, choose Image > Transform > Distort. (Photoshop: In the Menu Bar, choose Edit > Transform > Distort.)
- On the document, grab the top left corner handle of the bounding box and drag slightly downward and to the left as shown. Click the checkmark to commit.
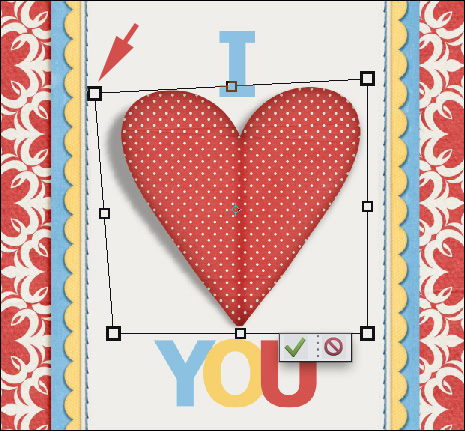
This will make the left side of your heart appear to be folded up off the page.
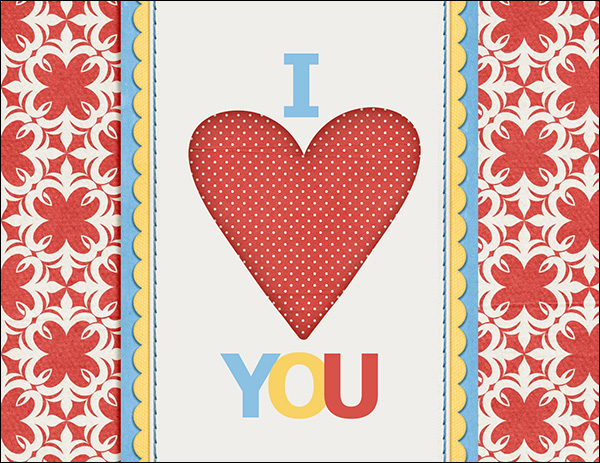
I created a card using my folded heart, I think this would make a perfect Valentine’s Day card!

I hope this inspires you to create your own folded embellishments and maybe a card or two.
Credits:
Card: Syndee Rogers-Nuckles
Kit: Carefree by Amanda Heimann
Fonts: Impact Regular
Software: Photoshop Elements 14, Adobe Photoshop CC 2015

![]()
_____________________________________________
 Author: Syndee Rogers-Nuckles | Contact Us
All comments are moderated.
Please allow time for your comment to appear.
6 Responses
Janice Dreher
Thanks for these great tutorials – although you are talking about text, I can see that these can be used on other pngs to create some awesome looks.
Syndee Rogers
I’m glad you enjoyed the tutorial Janice! You are right, you can use this method for many other projects 🙂
Jo Campbell
Very timely! Cool effect. Thank you.
Syndee Rogers
You are welcome Jo!
Jeffri
Thank you very much for sharing this wonderful tutorial and free heart download! So cool! I love learning new techniques.
Syndee
So glad you enjoyed it Jeffri!