Squares Gone Wild!
by Syndee Rogers-Nuckles
You will never look at squares the same way after you get ahold of the Polygonal Lasso tool. In this fun tutorial learn how to create imperfectly shaped squares, you won’t believe how easy it is.
Step One: Prepare the Workspace
- Create a new 12×12 inch document (File > New > Blank File) at 300 ppi with a white background. (Photoshop: Choose File > New.)
- Open a background paper (File > Open) for the scrapbook page.
- On the paper document, hold down the Shift key and click and drag the paper onto the new document.
- Close the original background paper.
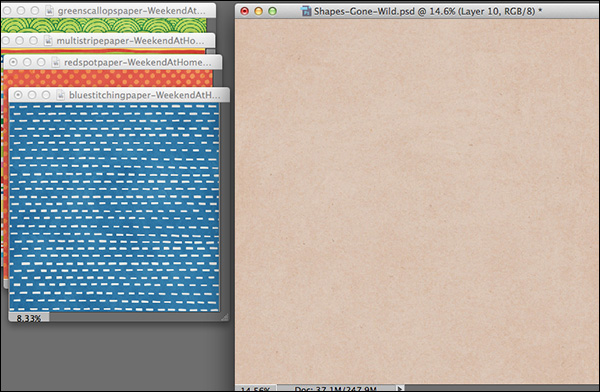
- Open several papers that coordinate with the scrapbook page and each with other. I am using papers from Weekend At Home by Kate Hadfield.
Step Two: Create the Squares
- Click on one of the coordinating papers to activate it. I am using the redspotpaper-WeekendAtHome-KateHadfield.jpg for my first square.
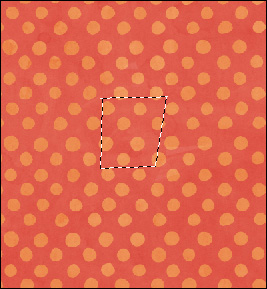
- Get the Polygonal Lasso tool. It’s nested with the Lasso tool.
- In the Tool Options, click on the New Selection icon, set the Feather to 0, and check Anti-Aliasing.
-
On the paper, click where you want the first straight segment to begin, and click a second time where you want the segment to end and the next one to begin. Continue clicking to create three segments. Position your cursor over the starting point and click. A closed circle appears next to the cursor when you are over the starting point. See the screenshot below for reference.
Note: If you are unhappy with your lines or shape, press the Esc key to start over. I made my squares between 1″- 2″ inches in size.
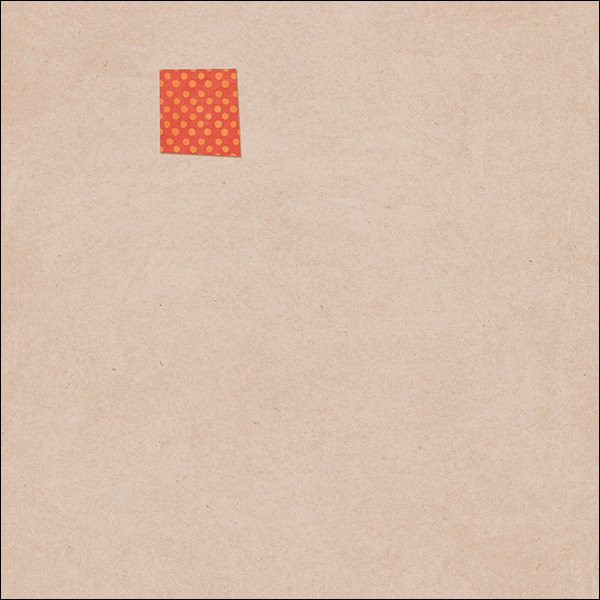
- Press Ctrl C (Mac: Cmd C) to copy the selection.
Step Three: Add Squares to Scrapbook Page
- Click on the scrapbook page to activate it.
- Press Ctrl V (Mac: Cmd V) to paste the square onto the page.
- Get the Move tool.
- On the document, click and drag the square into a desired position.
- Repeat Steps 2 and 3, making each square different until you have enough to complete your desired design.

Step Four: Duplicate the Squares (Optional)
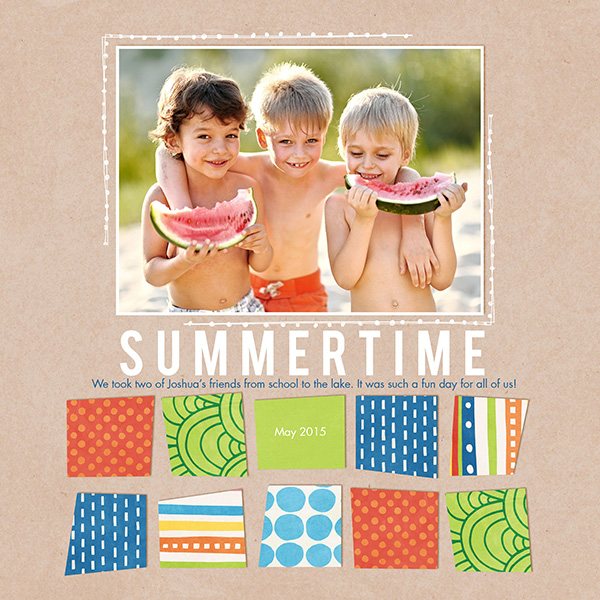
I created 14 squares for my layout. To speed up the process, you can create a square and then duplicate and rotate it.
- Get the Move tool.
- On the Layers panel, click on one of the square layers to activate it.
- Press Ctrl J (Mac: Cmd J) to duplicate the layer.
- On the scrapbook page, click on the duplicate square and move it into position.
- Press Ctrl T (Mac: Cmd T) to get the Transform options. Hover your cursor near a corner handle of the bounding box until you see a double headed arrow. Click and drag clockwise or counterclockwise until you are happy with the position.
- Click the checkmark to commit the changes.
Here is my finished layout using my squares gone wild.
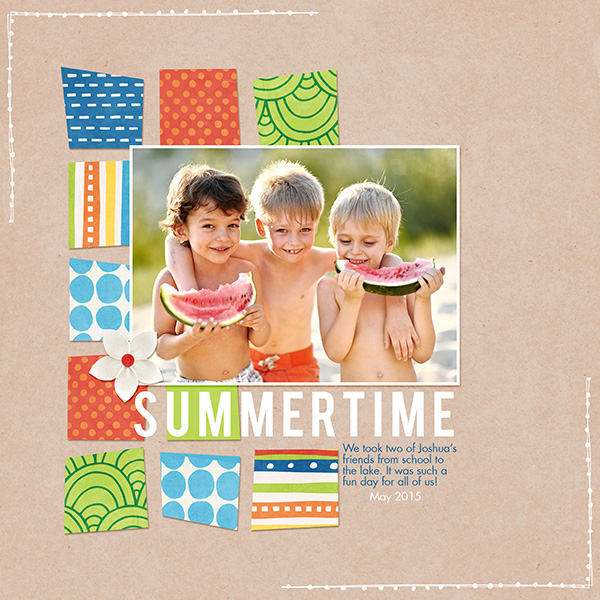
I had so much fun creating these squares that I just couldn’t stop playing! By moving the squares down below my photo I created a completely different look. They might be fun as a border around the page as well.
I hope you have fun trying out this easy and fun technique, why not cut out different shapes like irregular circles, rectangles or stars? I can’t wait to see what you come up with in the Digi Scrap Tutorial Gallery.
Credits:
Page & Photo: Syndee Rogers-Nuckles, zagorodnaya
Font: Futura Book Regular
Kit: Weekend At Home by Kate Hadfield
Software: Photoshop Elements 14, Adobe Photoshop CC 2015

_____________________________________________
 Author: Syndee Rogers-Nuckles | Contact Us
All comments are moderated.
Please allow time for your comment to appear.
7 Responses
Su Hall
So simple, yet, it never occurred to me to do something like this! Thank you!
Syndee Rogers-Nuckles
You are welcome!
lindar
Looks like fun. thanks Syndee.
Sharron
Thank you! It is quirky, but fun!
Syndee Rogers-Nuckles
Thank you!
Syndee
So glad you like it!
Ruth316
Love this idea where I can use some quirky or patterned papers that would be too distracting for the entire background! I hope to try it soon. Thanks for sharing this – should be reasonably easy to do.