Creased Photo
by Syndee Rogers-Nuckles
Gradients can do so much more than just color objects or add a variegated color effect. After getting to know Gradients and all they can do, I am convinced they are part pixie.
In this tutorial you will learn how to add a crease to a photo with a little bit of gradient magic. You won’t believe how simple it is!
Step One: Prepare the Workspace
- Press the letter D to reset the Color Chips to the default of black and white.
- Open up a photo (File > Open) you would like to add a crease to.
- In the Menu Bar, choose File > Duplicate. Click OK. (Photoshop: Choose Image > Duplicate.)
- Close the original photo.
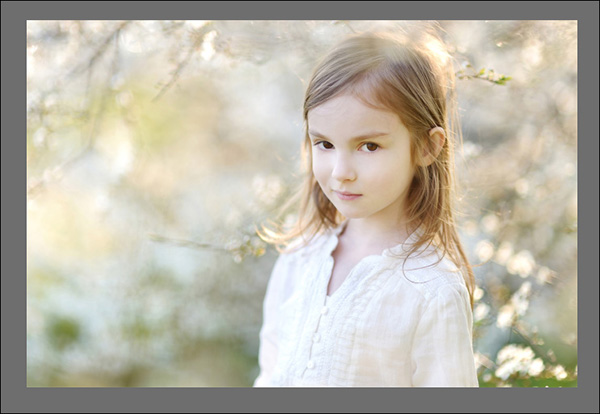
Here is the photo I will be working with.
Step Two: Add the Gradient
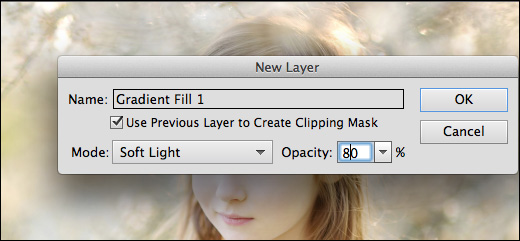
- In the Menu Bar, choose Layer > New Fill Layer > Gradient.
- In the dialog box, check Use Previous Layer to Create Clipping Mask. Set the Mode to Soft Light and the Opacity to 80%. Click OK.
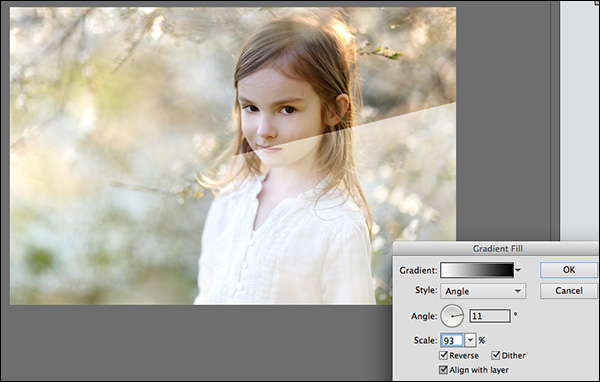
- In the Gradient Fill dialog box, open the Gradient Picker and choose Foreground to Background. If you do not see Foreground to Background, open the fly-out menu and choose Large List. Then open the menu again, choose Reset Gradients, and click OK.
- Set the Style to Angle, Angle to 11 degrees, Scale to 93%, and check Reverse, Dither, and Align with layer.
- Do not click OK yet.
You should now see a very defined line that will act as the crease on your photo.
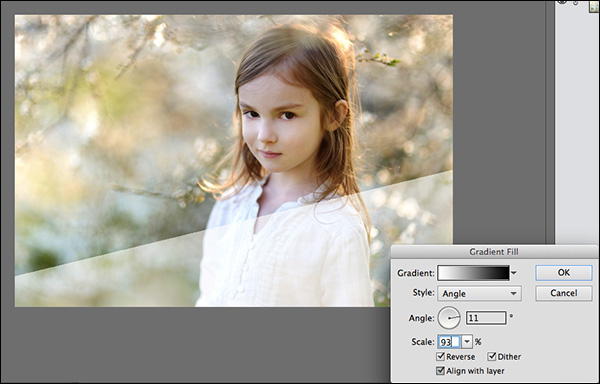
Step Three: Reposition the Gradient
- On your photo, click and drag the gradient into position, placing the line where you would like your crease. I’ve moved my line down below her neckline and all the way to the left side of the photo.
- In the dialog box, click OK.
Step Four: Move the Photo onto a Scrapbook Page
- Press Ctrl E (Mac: Cmd E) to merge the gradient layer down to the photo layer.
- Save the photo (File > Save As) with a unique name.
- Open a layered scrapbook page (File > Open) on which you would like to use the photo.
- In the Layers panel, click on the top layer to activate it.
- Click on the photo document to activate it.
- On the document, click on the photo and drag it onto the scrapbook page.
Here is my finished page with the creased photo. Notice that I added a simple white stroke frame and a drop shadow. Remember not to limit yourself to just adding creases to photos. Creases work great on alphas and papers as well. I can’t wait to see what you come up with in the Digi Scrap Tutorial Gallery.

Credits:
Page & Photo: Syndee Rogers-Nuckles, MN Studio
Kit: Christmas Chic by NLD Designs
Fonts: AT Mahogany Script
Software: Photoshop Elements 14, Adobe Photoshop CC 2015

_____________________________________________
 Author: Syndee Rogers-Nuckles | Contact Us
All comments are moderated.
Please allow time for your comment to appear.
7 Responses
abbynormal
Thank you so much for the tutorials. Such wonderful instructions. Thank you for sharing. Excited about using them!!
Sharron
Thank you – wonderful effect and final layout.
Syndee Rogers-Nuckles
You are welcome!
Renee
Thanks for sharing this tip. I always forget the magic that can be created with the gradient tool.
Syndee Rogers-Nuckles
So happy you enjoyed it!
Judy Shinlever
Thank you. Another great technique to try.
Syndee Rogers-Nuckles
You are so welcome!