Magical Confetti Brush
by Nann Dalton
I have a little secret weapon when I feel like my page is just missing something: splats, sprinkles, and scatters. I love the way they make my pages feel richer and fuller and how they can add a little fun. I just add a little here and there, and it gives my layout a little added dimension.
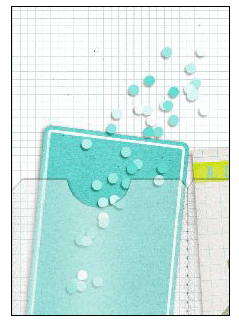
Take confetti, for instance. If you went to a party where confetti was used as a decoration, you probably didn’t go away thinking about the confetti… but the confetti definitely added a feeling of fun to the party. It’s the same thing with our layouts.
I am going to teach you how to make confetti the easy way. The hard way would be to use one brush stroke at a time — way too much work! The easy way is to make the brush do the work — creating the confetti on its own! With this tutorial, learn how to turn a simple hard round brush into a dynamic magical confetti brush. Ready for the party? Okay, let’s go!
Step One: Open and Prepare Your Layout
- Begin with a nearly finished scrapbook page.
- Press the letter D to reset the Color Chips to the Default of black and white.
- In the Tool Bar, click on the Foreground Color Chip, choose a color from your layout, and click OK.
Note: Your Confetti will be a mixture of your Foreground and Background Color Chips. So, if you don’t want your confetti to include white, sample out a color for your Background Color Chip also. But keep in mind, this technique will also blend your colors. (red + blue = purple) So, if you want your confetti to match your layout exactly, I suggest that you use white as the Background Color Chip.
Step Two: Create a New Layer
- In the Layers panel, make sure the top layer is the active layer.
- Click on the Create a New Layer icon.
Step Three: Create a Dynamic Confetti Brush (Photoshop Elements Only)
- Get the Brush tool.
- In the Tool Options, open the Brush Picker and choose a Hard Round brush. If you don’t see a Hard Round brush, open the drop down menu and choose Default Brushes.
- Increase the Size to around 40 px. Set the Mode to Normal and the Opacity to 100%.
Note: You can play around with the brush size later if this doesn’t seem right for what you are doing. - Click on the Brush Dynamics icon.
- Set the Hue Jitter to 100%, the Scatter to 60%, the Spacing to 100%, and the Hardness to 100%.
- In the Tool Options, click on the Brush Dynamics icon again to toggle it closed.
Step Three: Create a Dynamic Confetti Brush (Adobe Photoshop Only)
- Get the Brush tool.
- In the Options Bar, open the Brush Picker and choose a Hard Round brush. If you don’t see a Hard Round brush, open the fly out menu, choose Reset Brushes, and click Append.
- Increase the Size to around 40 px. Set the Mode to Normal and the Opacity to 100%.
Note: You can play around with the brush size later if this doesn’t seem right for what you are doing. - In the Options Bar, click on the Brush panel icon to toggle it open.
- In the Brush panel, change the Spacing to 100%.
- Click on Scattering and check the Scattering check box. Check the Both Axes box, set the Scatter to 500%, set the Count to 2, and the Count Jitter to around 81%.
- Click on Color Dynamics and check the Color Dynamics check box. Set the Foreground/Background Jitter to 80%.
- In the Options Bar, click on the Brush panel icon again to toggle it closed.
Note: If you just want Photoshop to make a bunch of colorful confetti for you and you don’t care about the colors, play with the Hue Jitter slide bar — it will give you a lot of different looks.
Step Four: Create Confetti
- On your scrapbook page, brush on your confetti.
- Add a small drop shadow of your choice.
Note: To add more colors, create a new layer and change the Foreground Color Chip for each color. Then add shadow to each layer. When you put each color on a different layer, it will make it look more realistic. Change your brush to make square, star, snowflake, or other kinds of confetti.
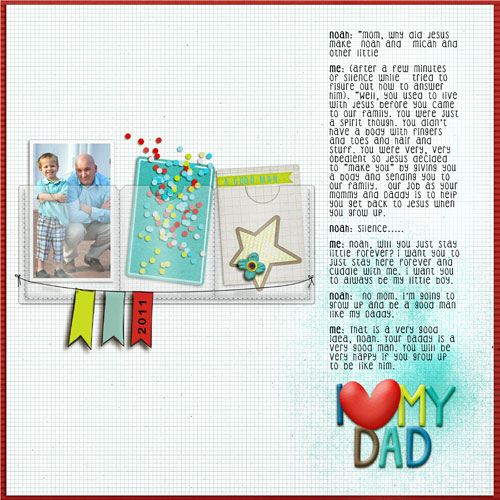
I love watching my confetti magically appear. Check out the layout below that I made using this technique. So spread out some confetti and let’s have a party in the Digi Scrap Tutorial gallery at Digital Scrapper!
Credits:
Digi Scrap Tutorial: Magical Confetti Brush by Nannette Dalton
Page & Photo: Nannette Dalton
Kits: Vagabond by One Little Bird, Dad’s Day by Digilcious Designs, Jubilee by One Little Bird
Tutorial: Pocket Your Thoughts by Susie Roberts
Font: DJB Coffee Shoppe Espresso
Note: Originally published July 2012.

![]()

_____________________________________________
 Author: Nannette Dalton | nann@digitalscrapper.com
All comments are moderated.
Please allow time for your comment to appear.
Leave a Reply